Tiny Living in a Big World

  • About
    • Philosophy
    • The Tiny House Movement
    • How To Get Started
    • Delivery
    • Media
  • TINY HOUSES
    • Gallery
    • Features & Options
    • Shell Builds
    • Tiny House Size Limitations
  • Tiny Commerce
  • Tiny House Plans
  • Pricing
    • Financing
    • Contract Pricing Details
  • FAQ
  • Other Services
  • Contact

© 2025 RMTH

Privacy Policy

Terms & Conditions

Wanderlust 24′ Tiny House

December 30, 2017 By Greg Parham 6 Comments

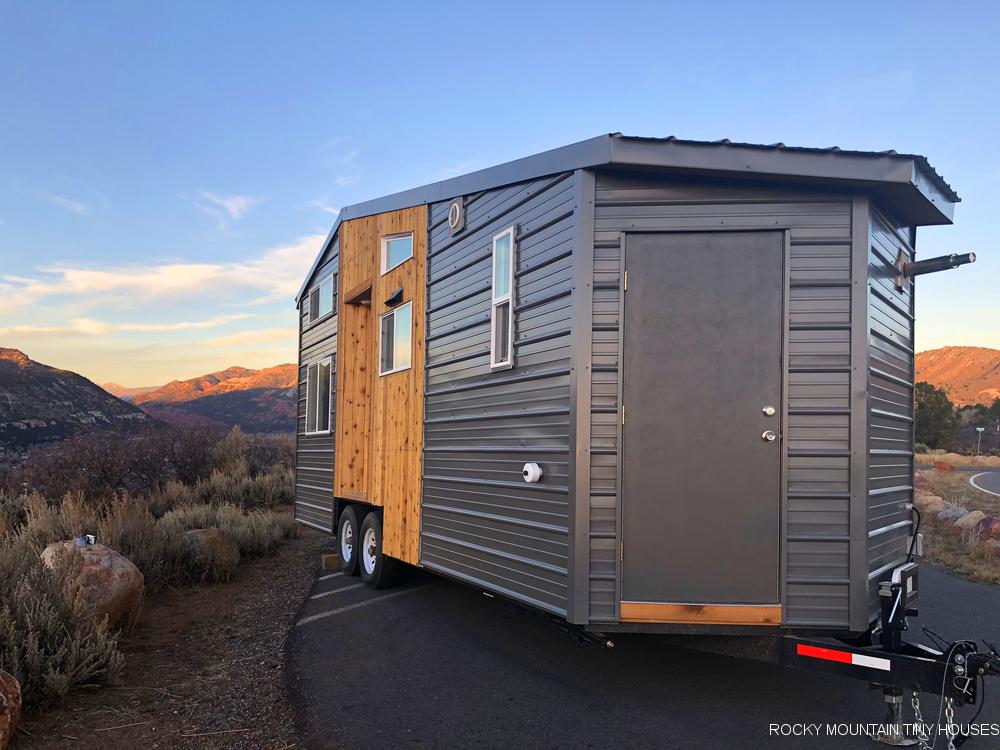
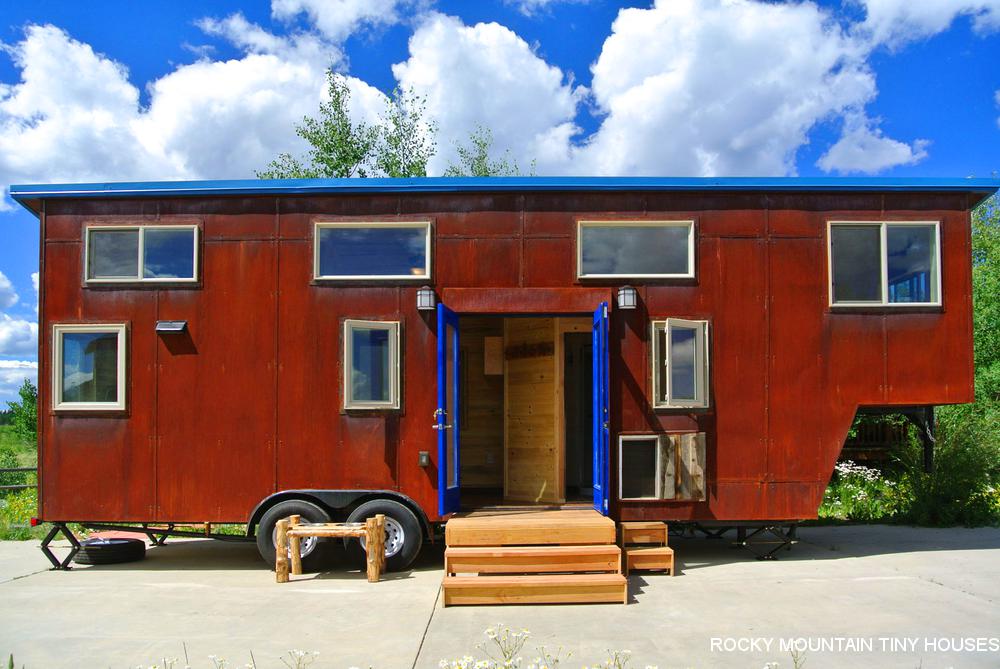
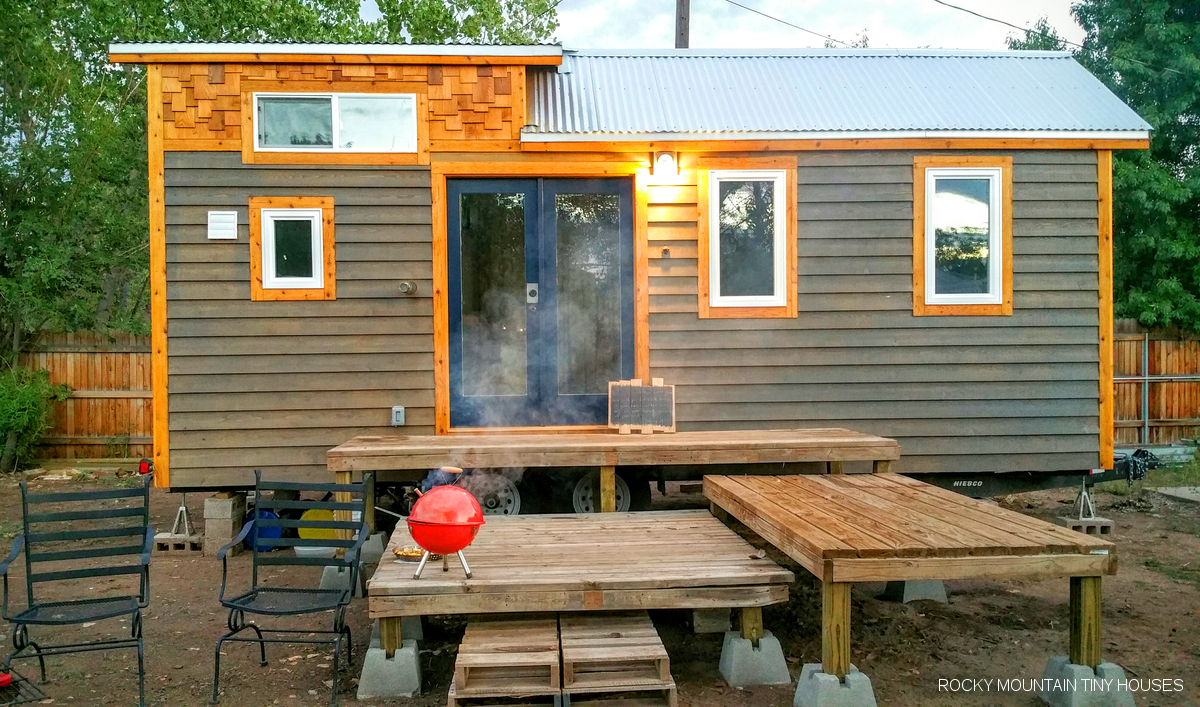
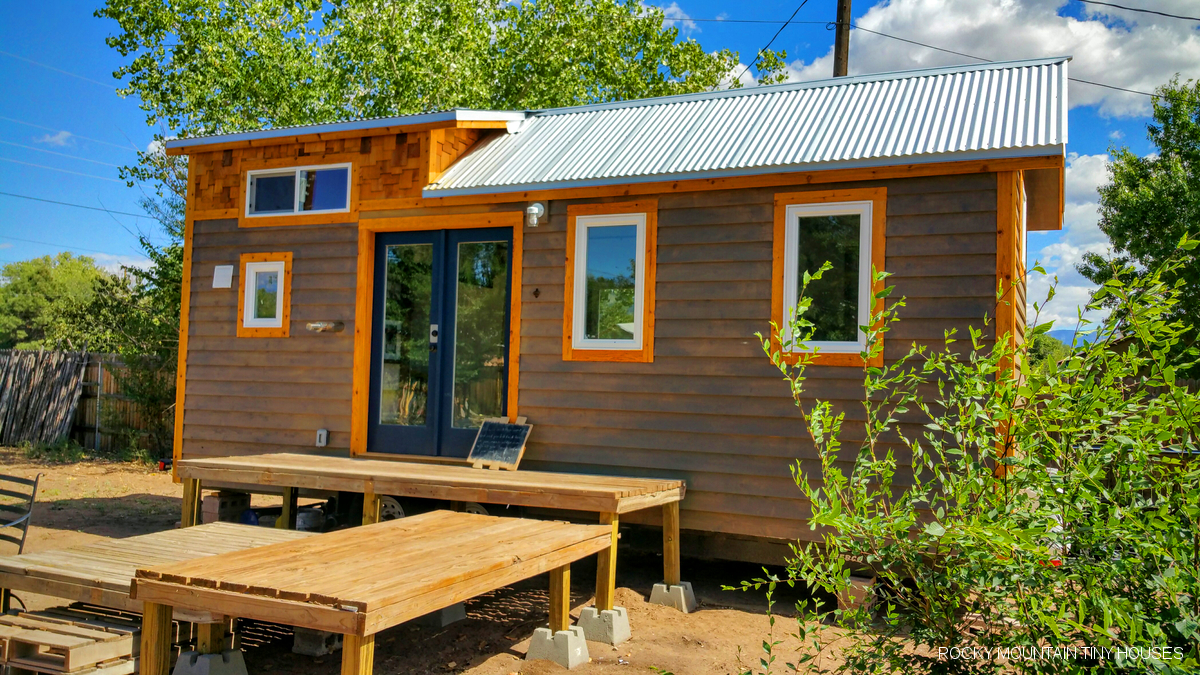
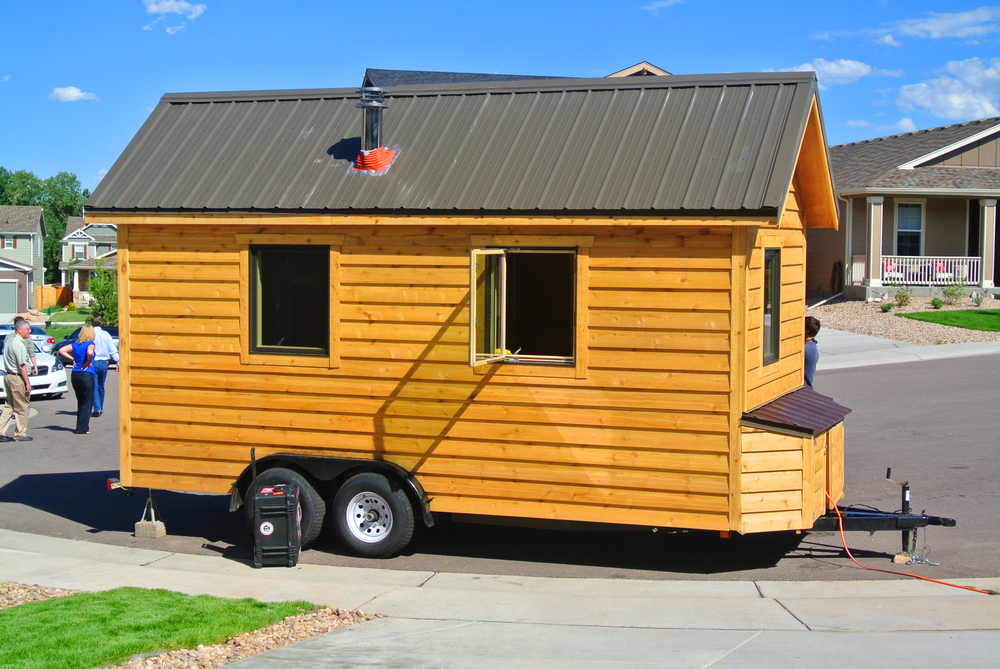
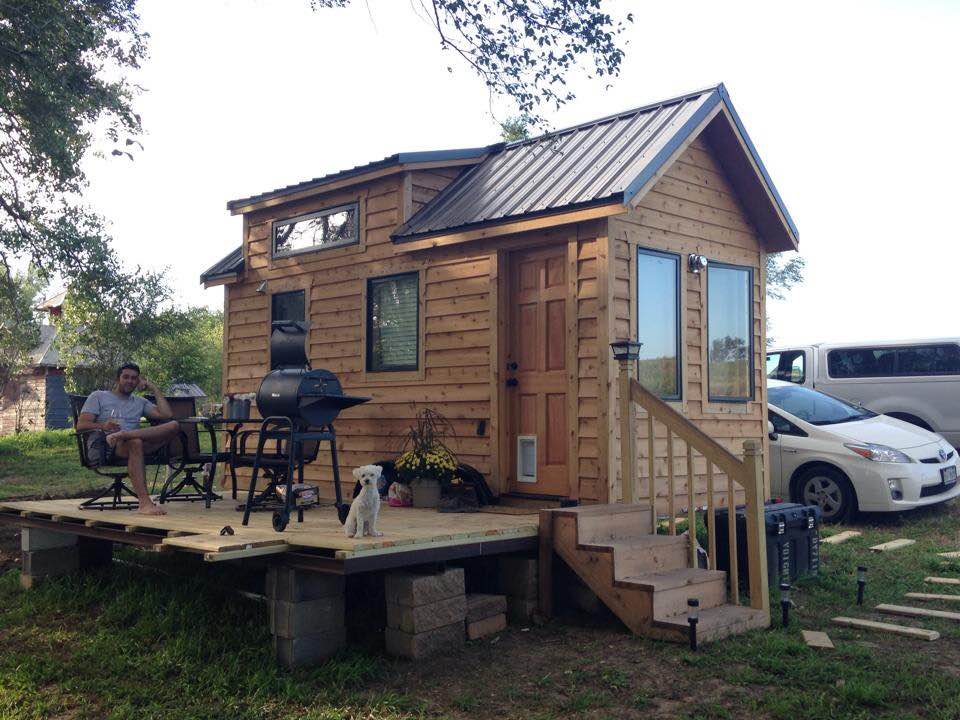
We recently completed this build for an awesome young couple living up in Great Falls, Montana. They are both in the military and wanted a home they could take with them wherever they get stationed. This, and they knew a tiny home would be a means for greater financial stability! They had a great interest in two designs by other tiny house enthusiast, the Shedsistence and the Tiny House Lab. They wanted to not only combine these two designs, but customize a few touches for their needs. So, if the shape looks similar to either of these houses, now you know why!

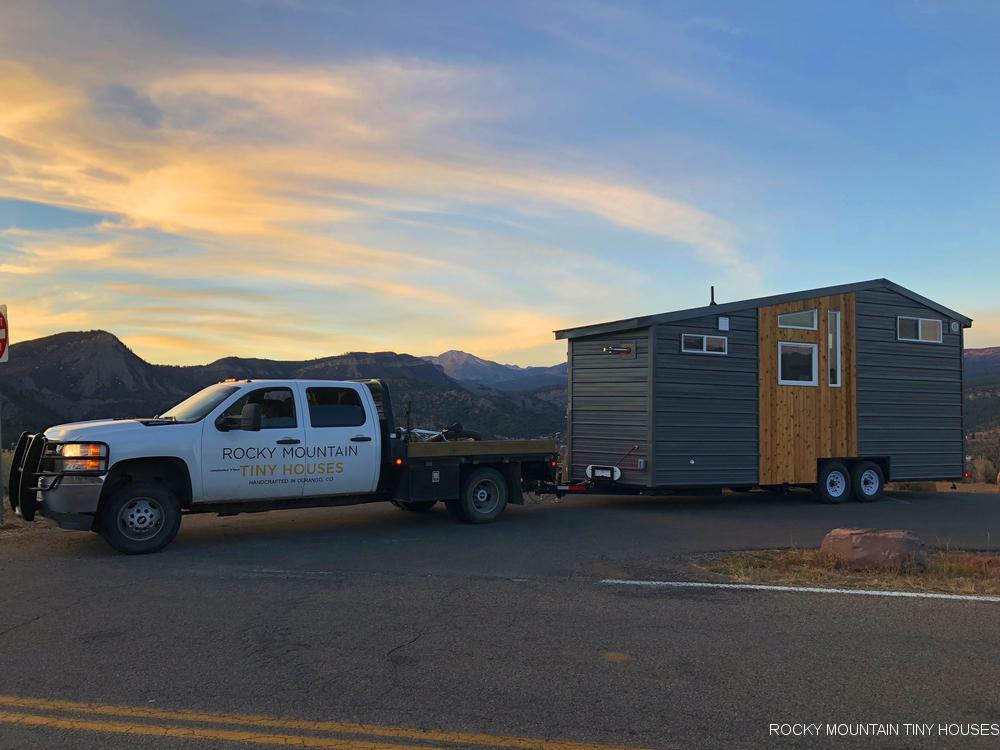
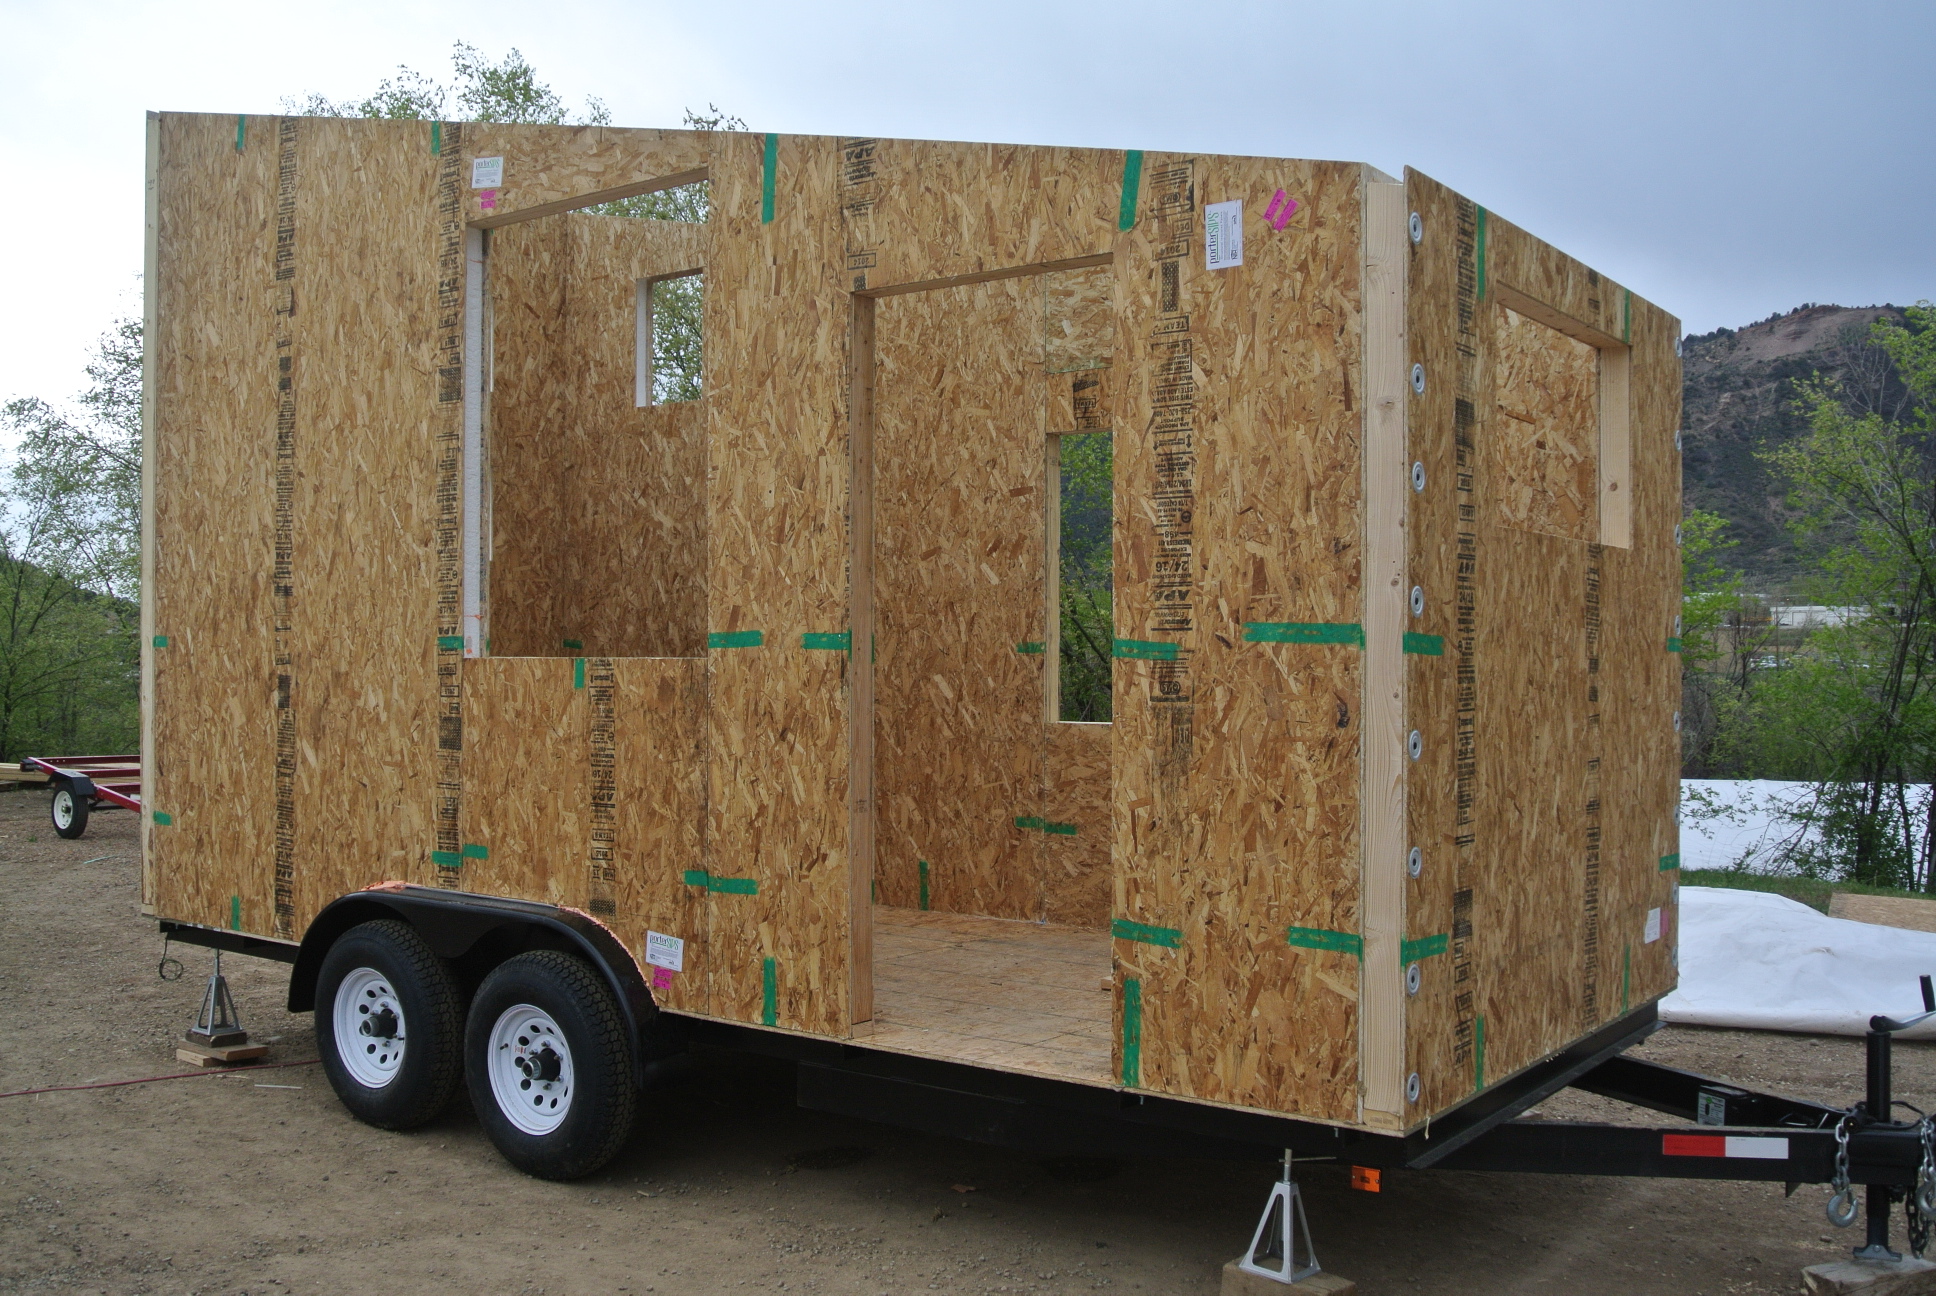
This design features unique variations compared to the other two.  The massing is a combination of each. We started out with a 8′-4″ x 24′ trailer, added a 30 degree vee nose similar to Tiny House Lab, but then applied the Shedsistence longitudinal asymmetric gable, perhaps more easily thought of as a front to rear shed roof with a ridge break and smaller beaver tail on the rear. The reasoning was several fold: aesthetics, introducing additional storage over otherwise wasted space on the tongue, weight distribution, and hopefully aerodynamics. Having towed it 973 miles from Durango to Great Falls, I can say that it probably pulled the best of any bumper pull house we’ve built to date. 

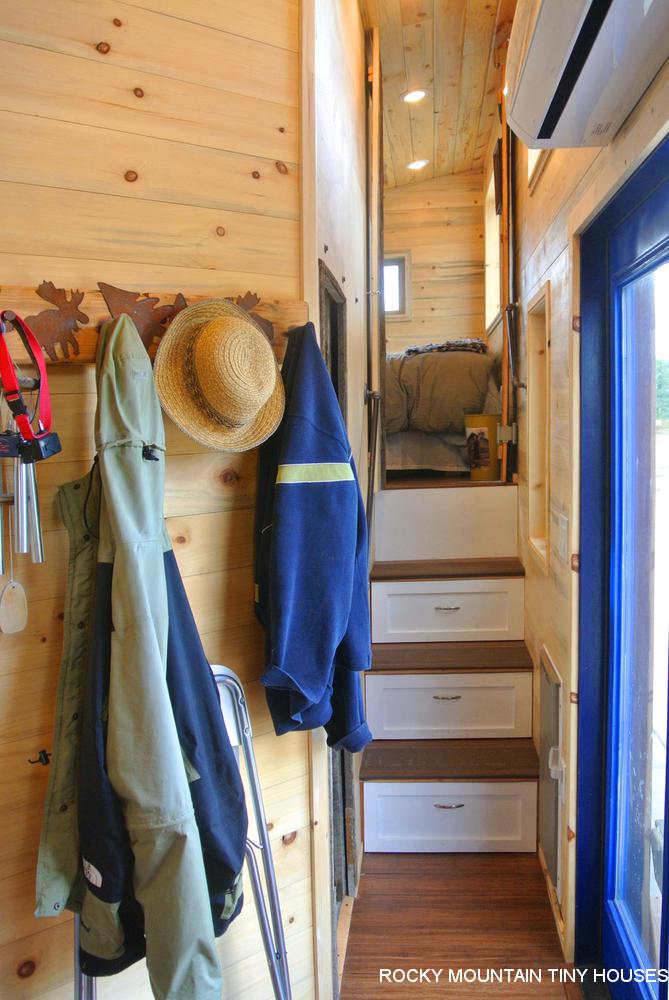
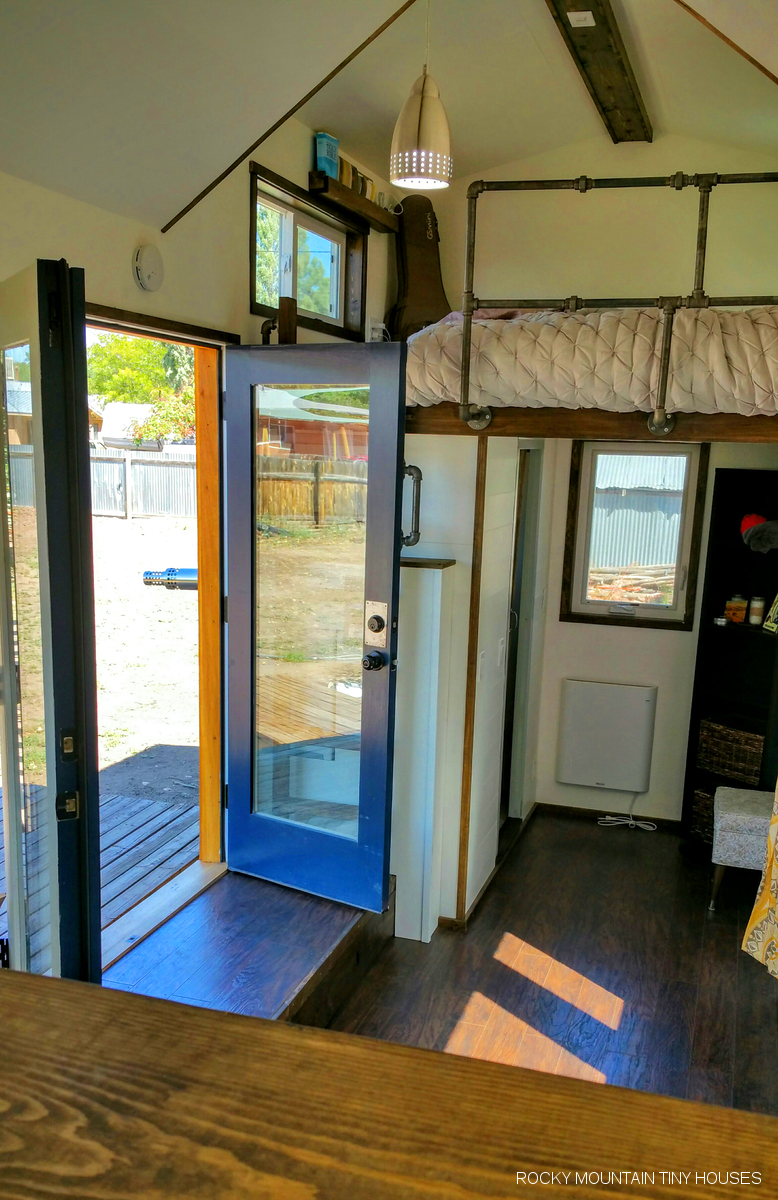
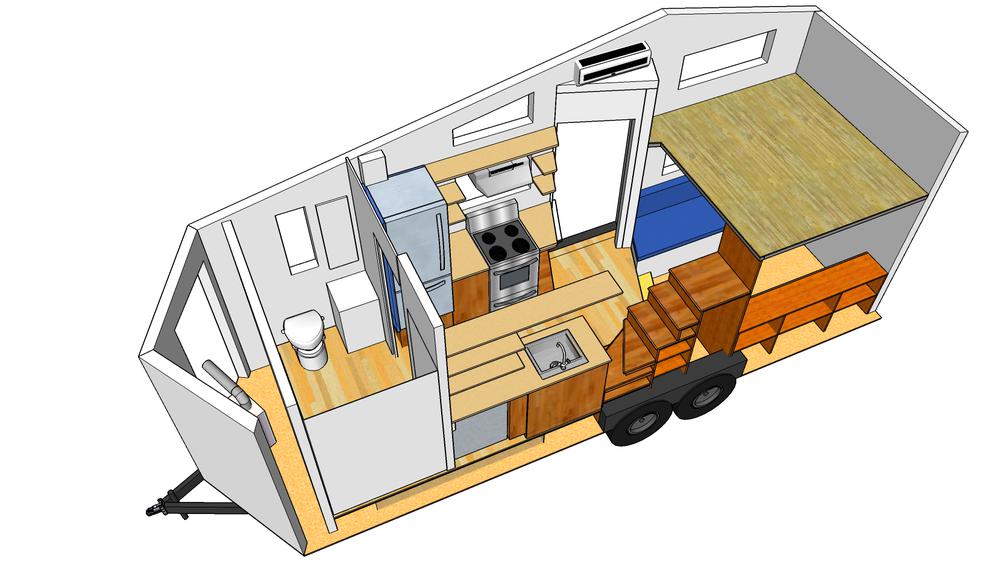
The trailer utilizes drop axles. As I always state, this makes towing slightly more difficult when navigating dips in the road and drainage gutters, etc., but it gave us an additional 4″ of height to play with in the design. This 4″ turned out to be critical in allowing us to build a 14″ tall platform above most of the primary floor. Under this platform is housed an 80 gallon freshwater tank, 60 gallon greywater tank, and abundant in floor storage for items that don’t get used everyday. This couple happens to be outdoor junkies, so they have quite the collection of camping and sports equipment that will primarily live here. The platform is accessed via three different ways: an opening from the gear shed side, on opening from the living room side where there is a removable step, and trap doors in the center of the floor, two in the kitchen and one in the bathroom. Like the Shedsistence design, there is also a gear shed in the front of the trailer. Adding the vee nose made this space a little larger, however. We placed the water heater and off grid water equipment in this space. Since this platform and gear shed is difficult to understand by looking at the photos, here are some 3d renderings to clarify.


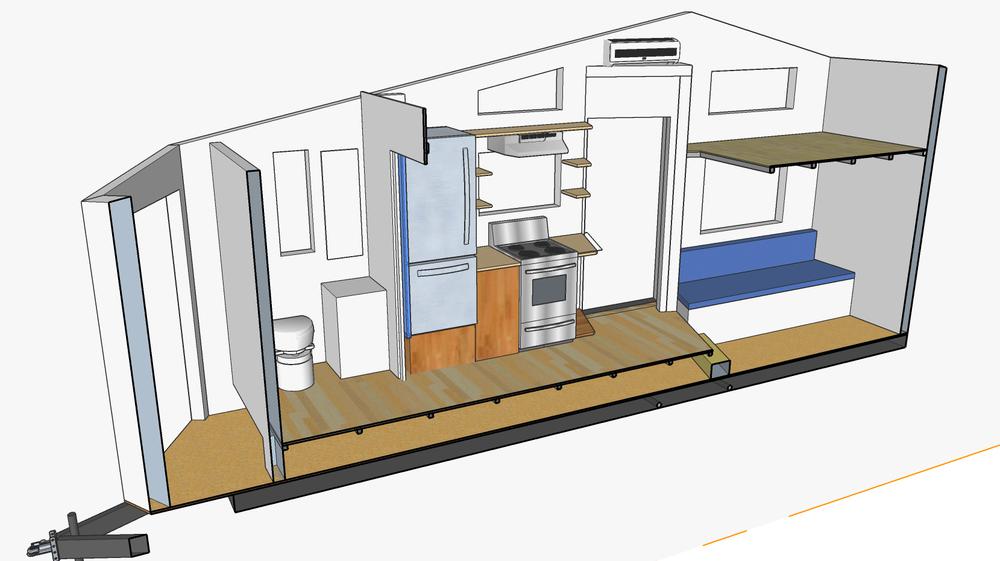
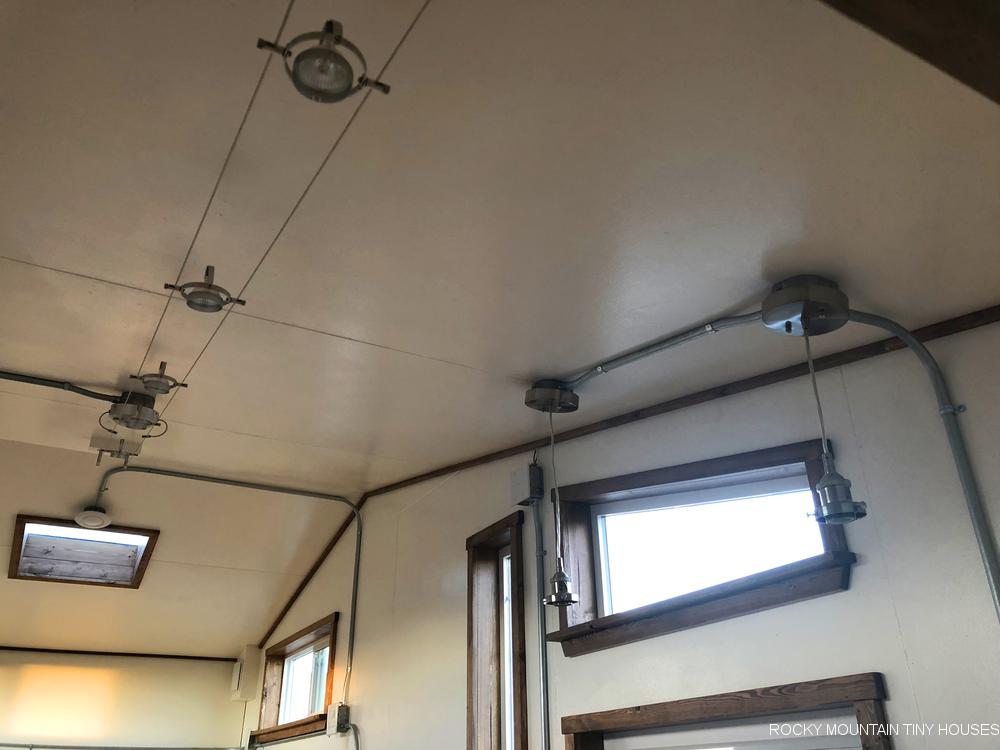
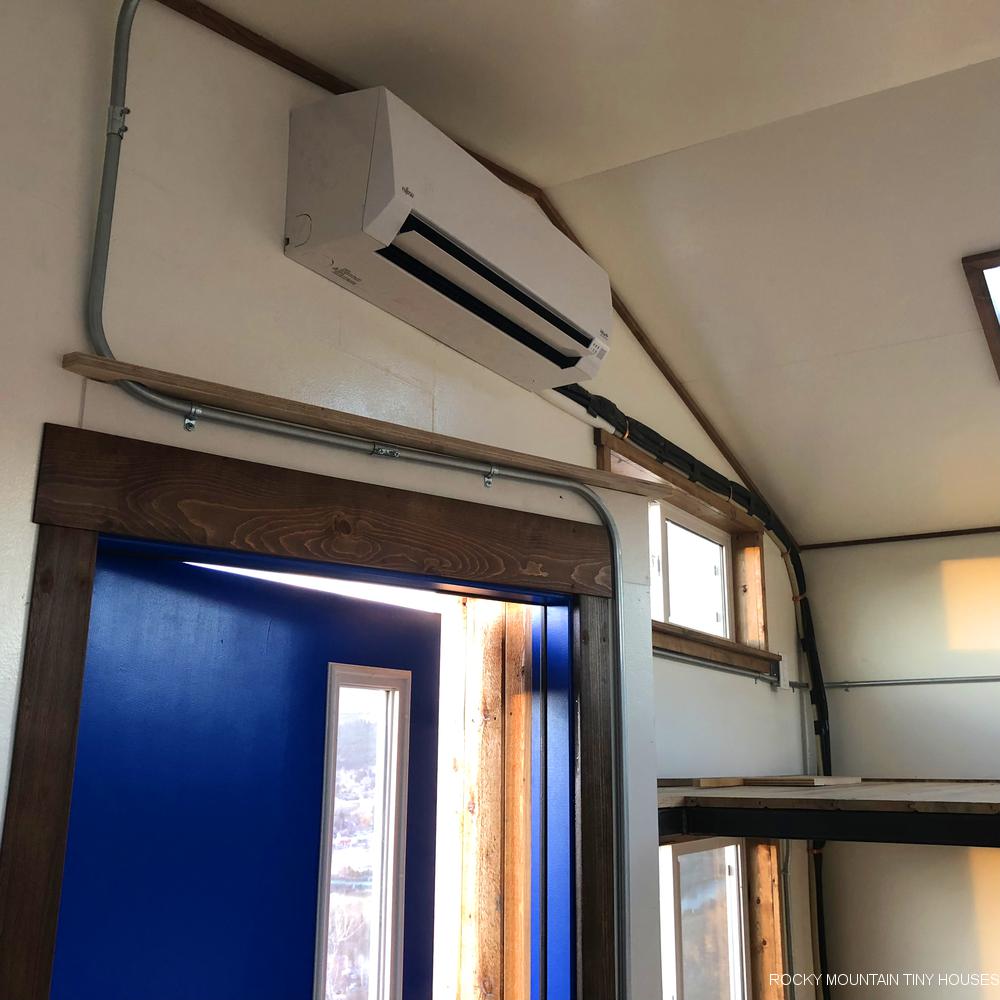
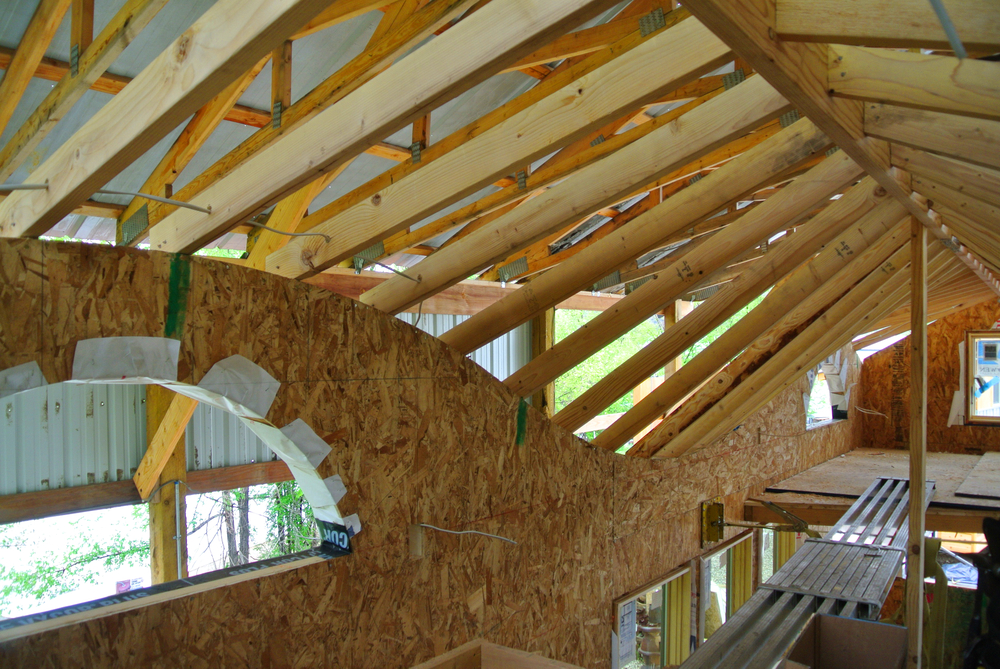
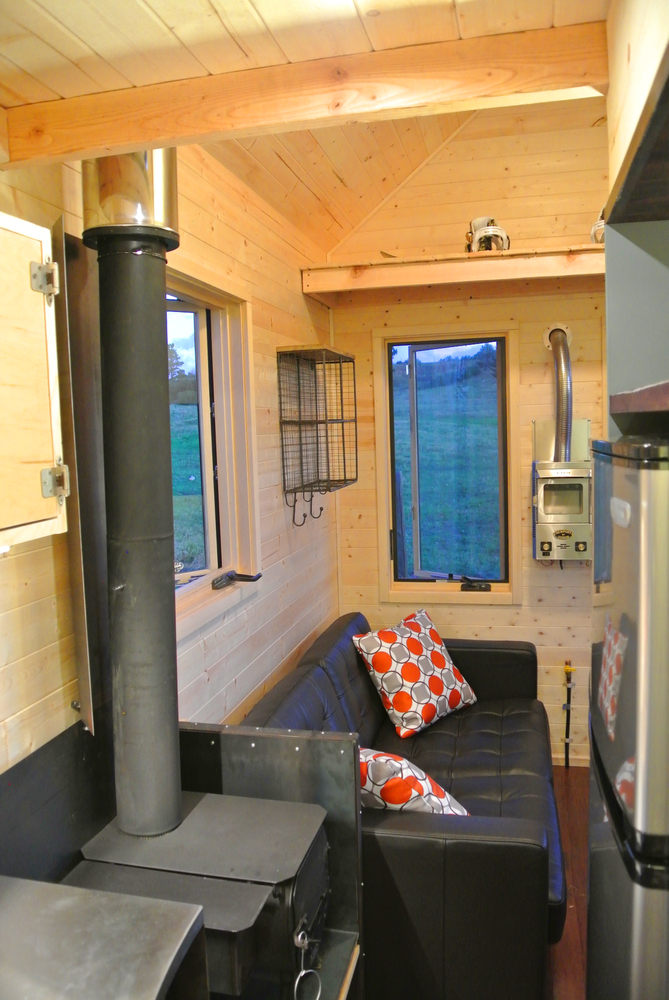
This tiny was constructed using SIP’s, which not only took a lot of the guess work out of the crazy angles, but will ensure the house is easier to heat and cool no matter where this couple gets stationed. We installed a Lunos E2 heat recovery ventilator to provide constant healthy fresh air while recovering heat energy. All plumbing lines are fully accessible in heated space. All electrical lines were ran in surface mounted conduit. They preferred the industrial look but also wanted full access to wiring should anything go wrong, or they needed to make additions since altering wires in SIP chases can be extremely difficult after wall finishes have been installed. 

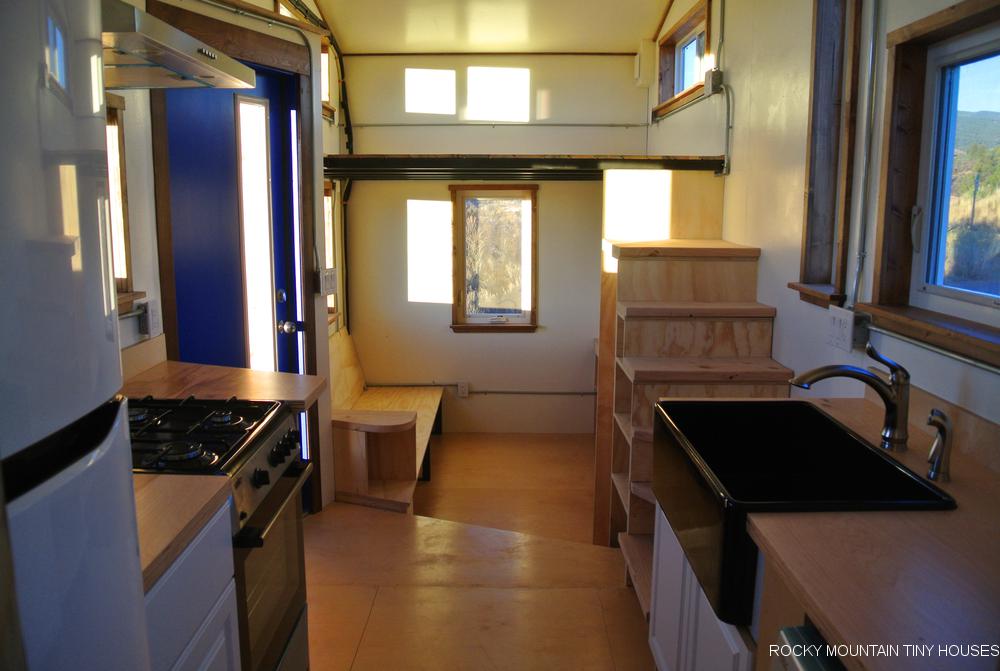
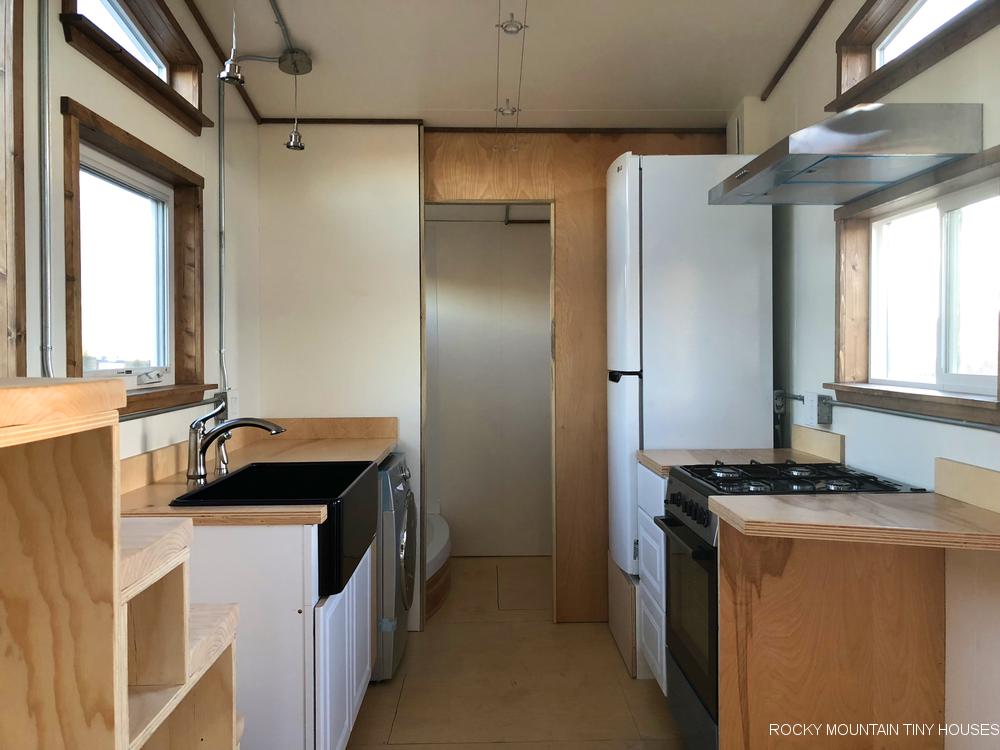
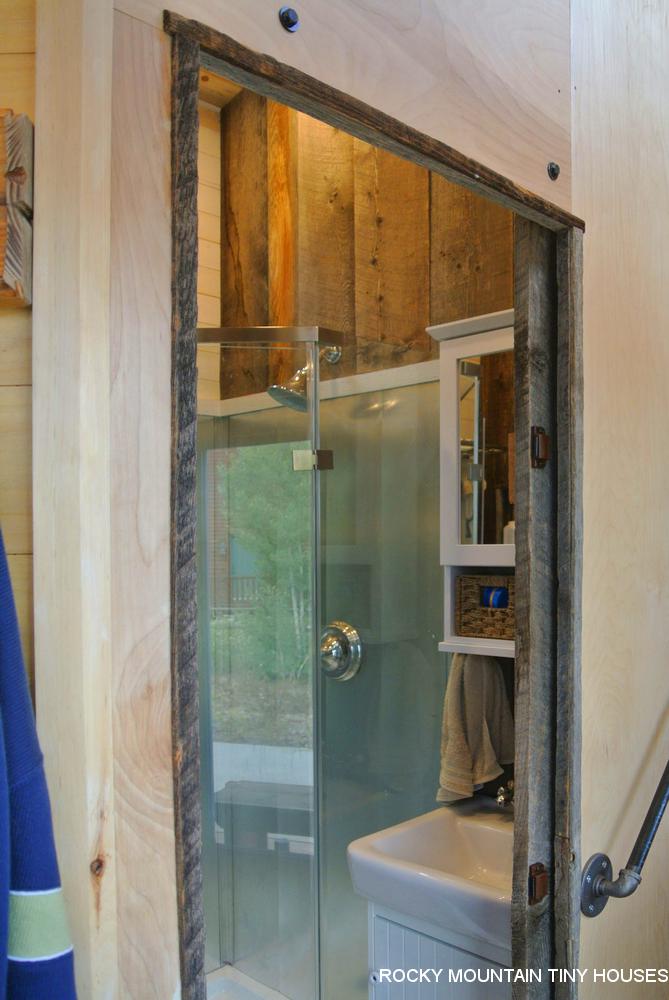
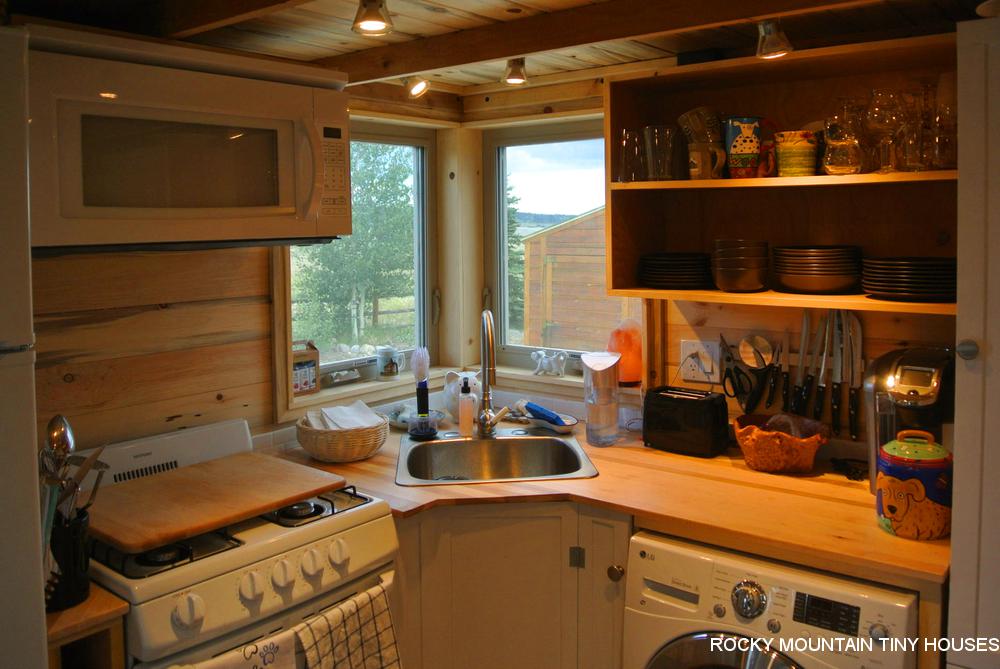
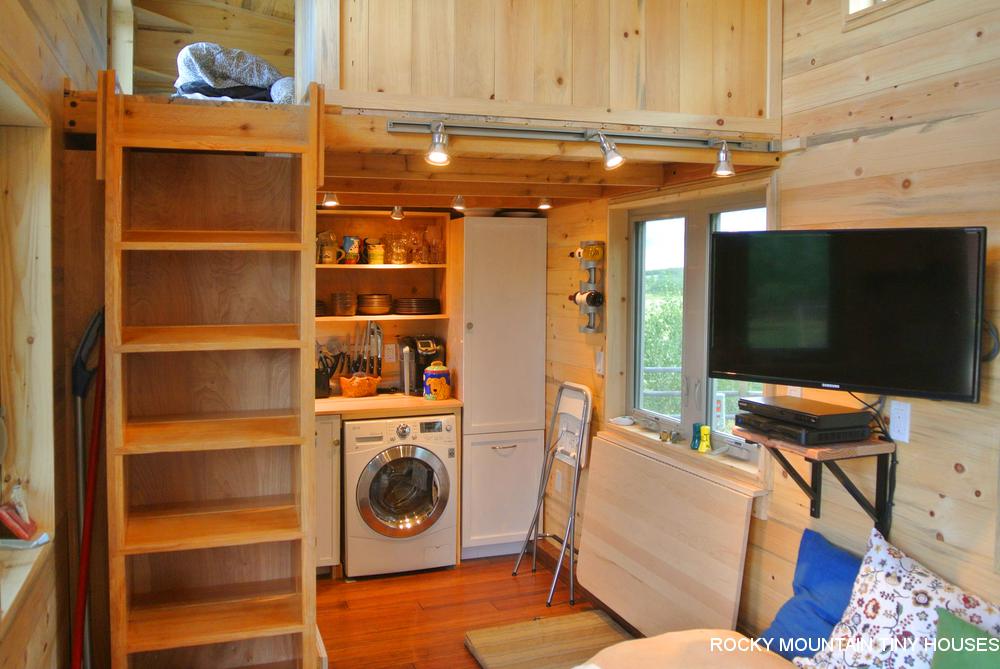
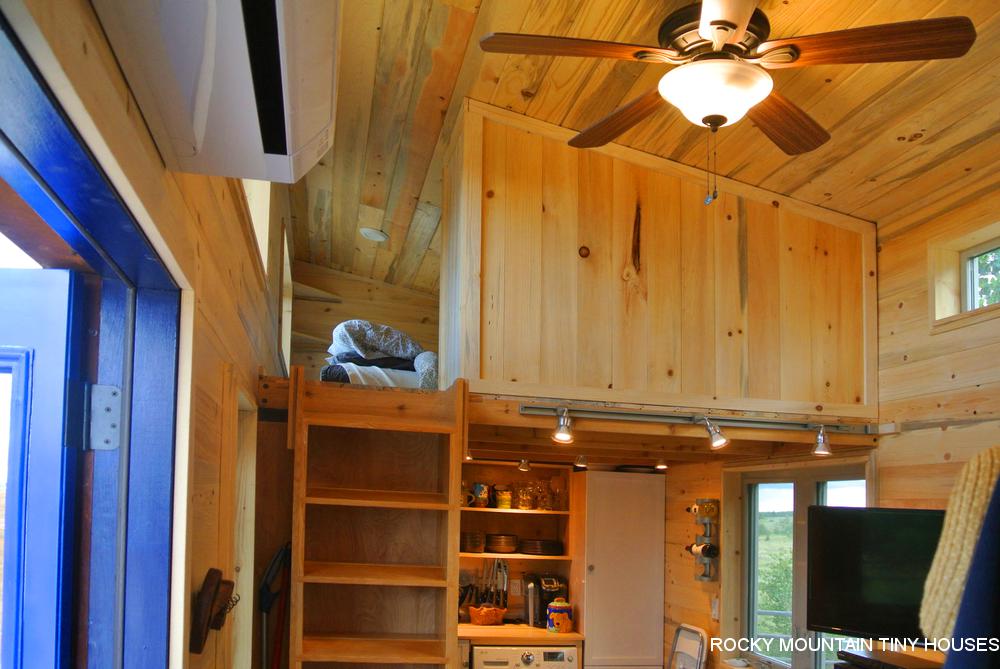
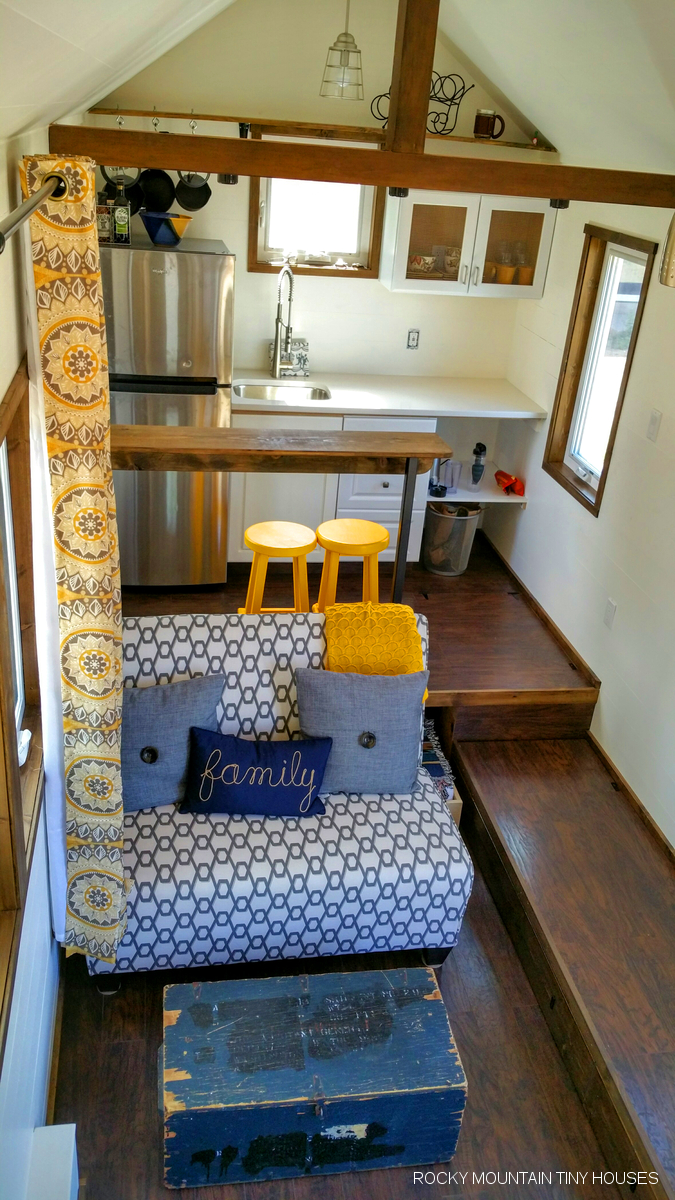
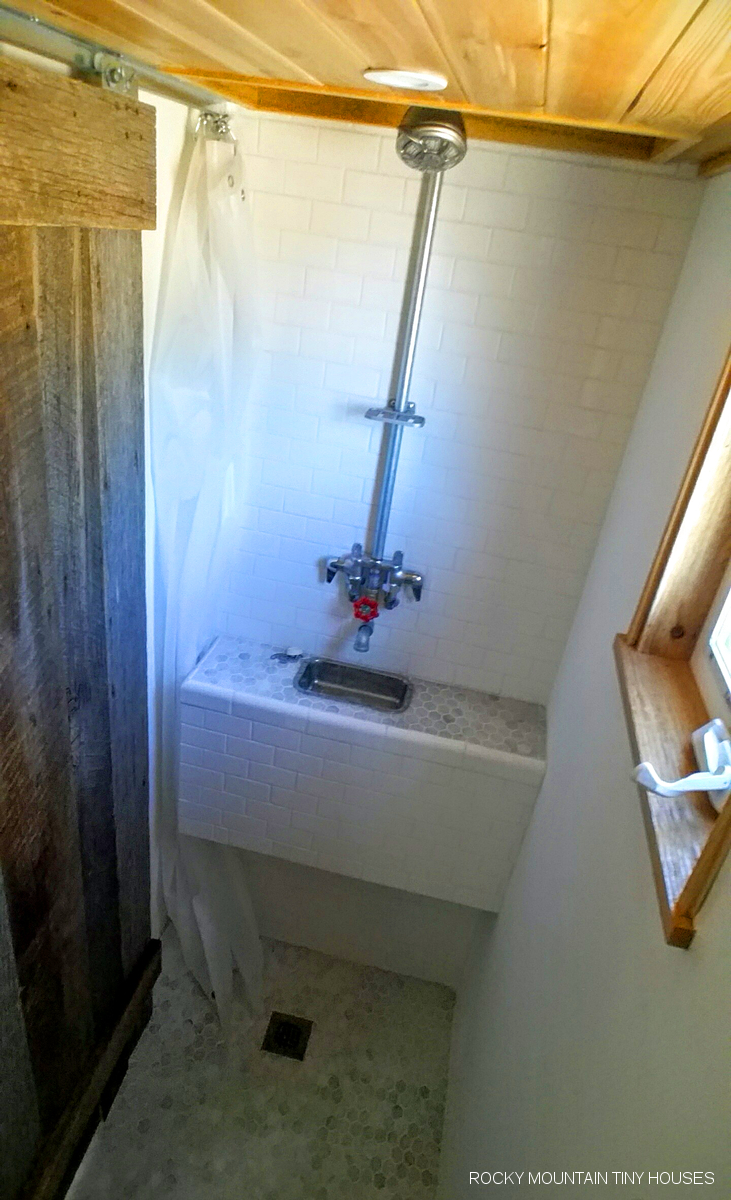
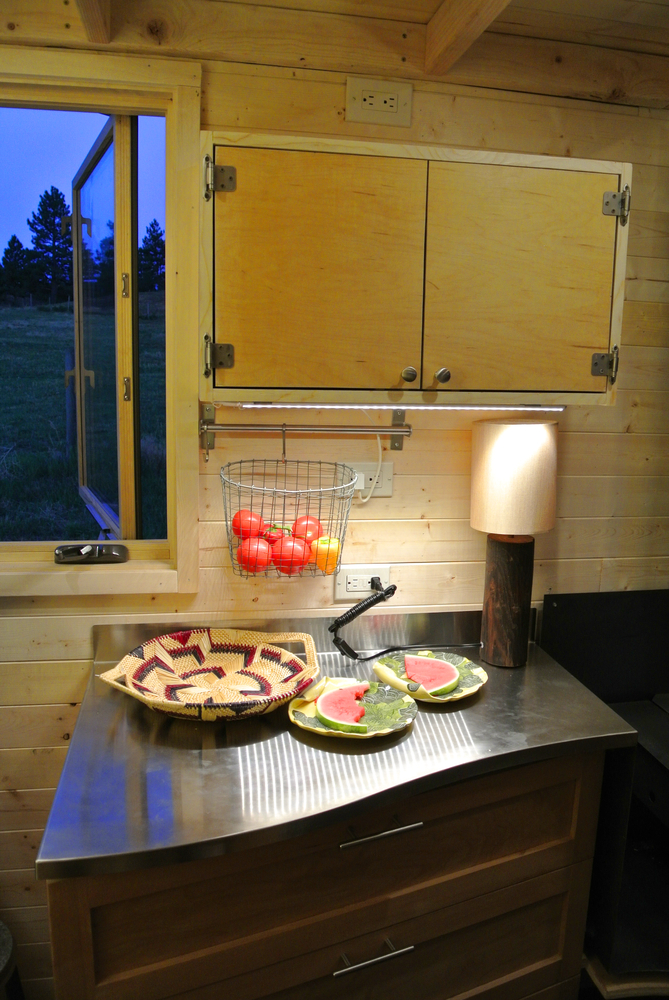
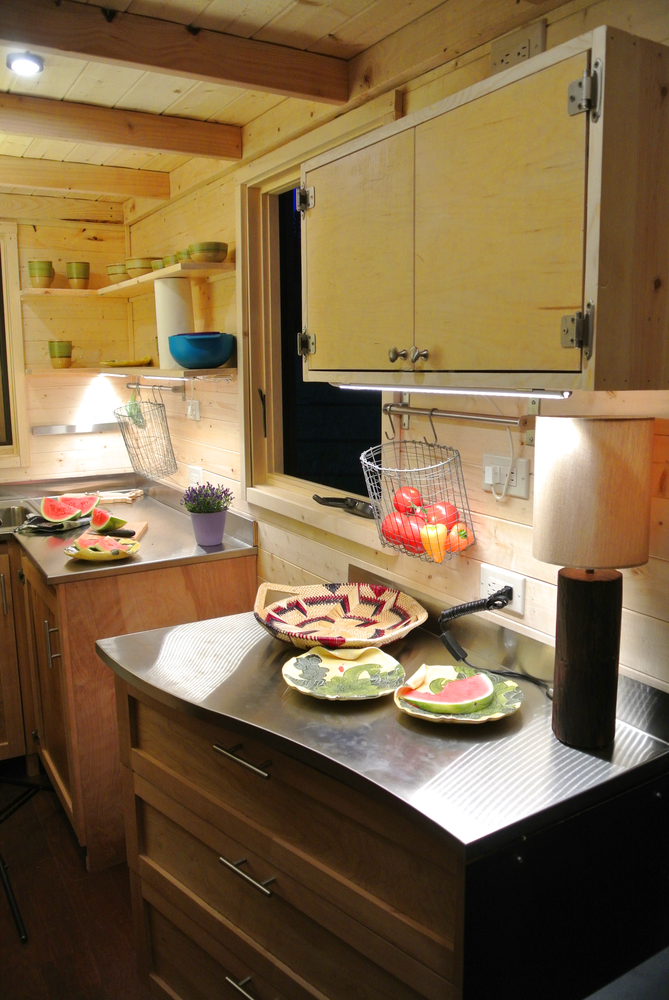
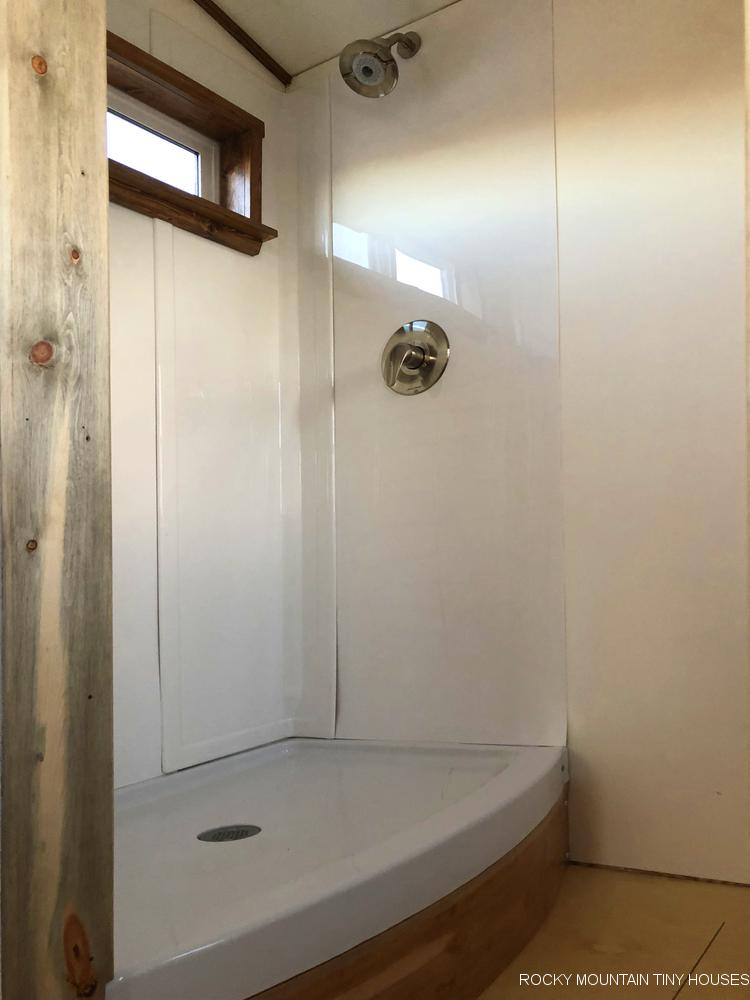
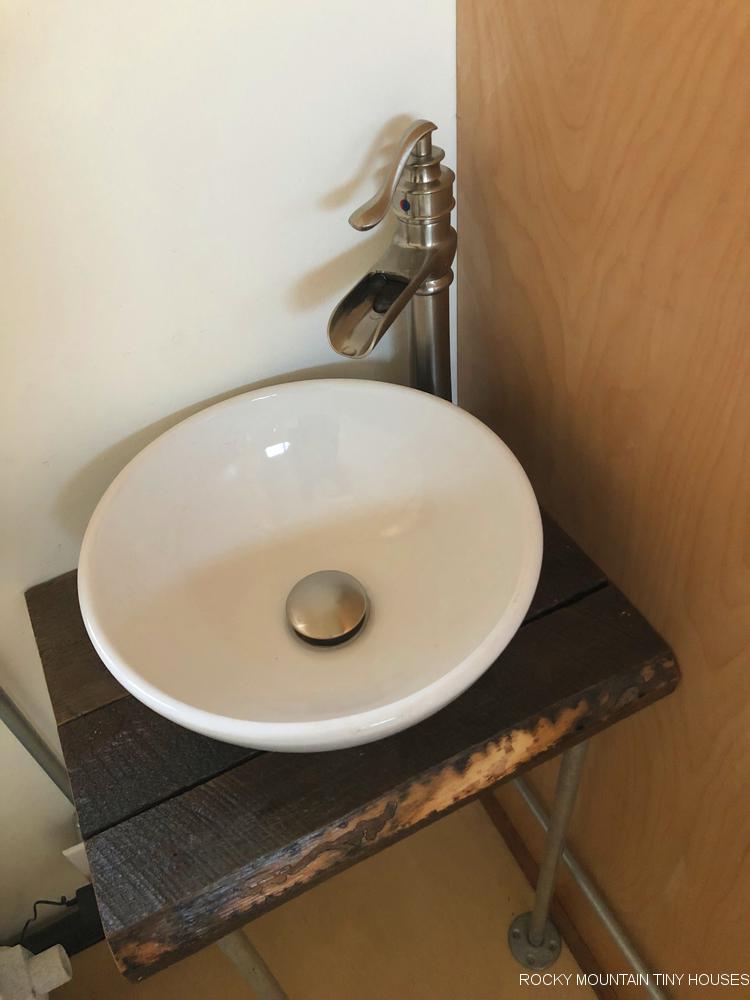
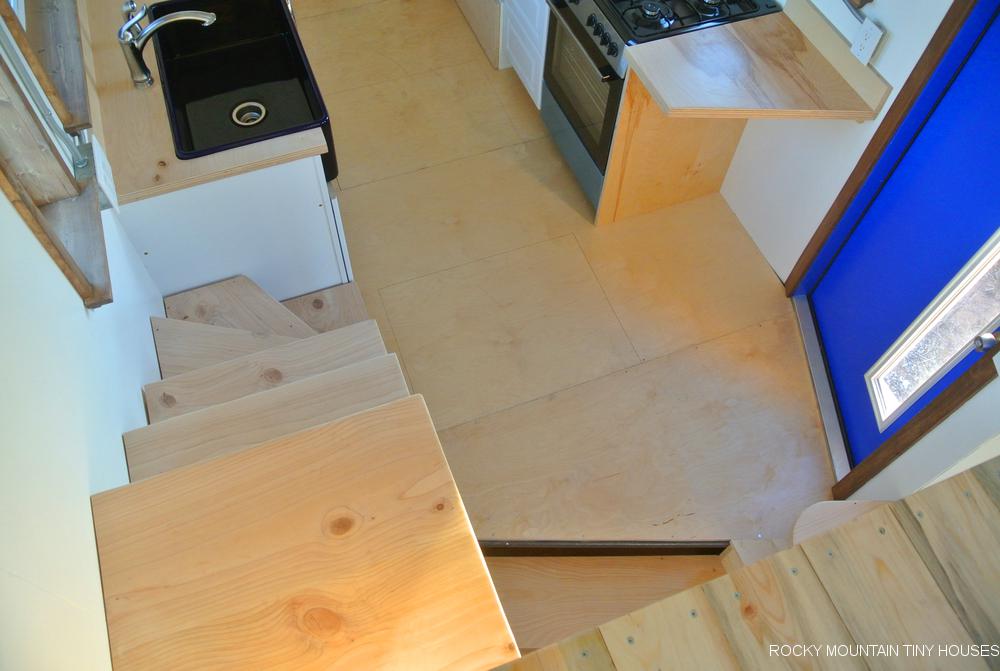
The kitchen features a gorgeous dark blue clay fired apron sink, 24″ gas range with modern range hood, W/D combo, and a bottom freezer fridge. Past the kitchen is entry into the bathroom which  has a generous 42″ shower enclosure, Nature’s Head compost toilet, and a vessel sink mounted to a barn wood platform. There is a partition wall that separates the bathroom from the gear closet on the very front of the trailer. This shed is accessed via a separate exterior door. 

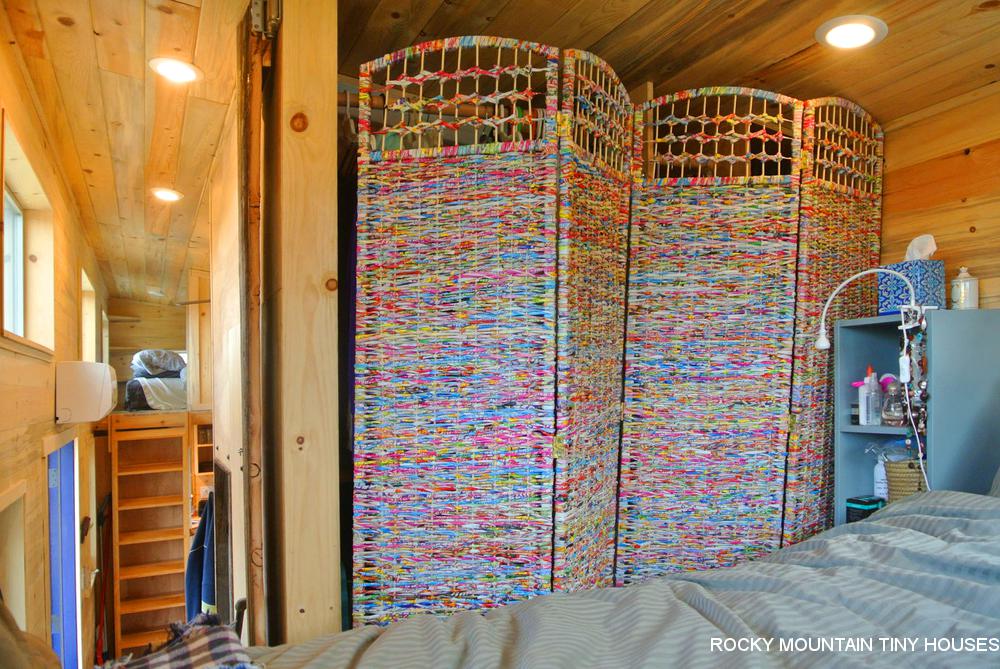
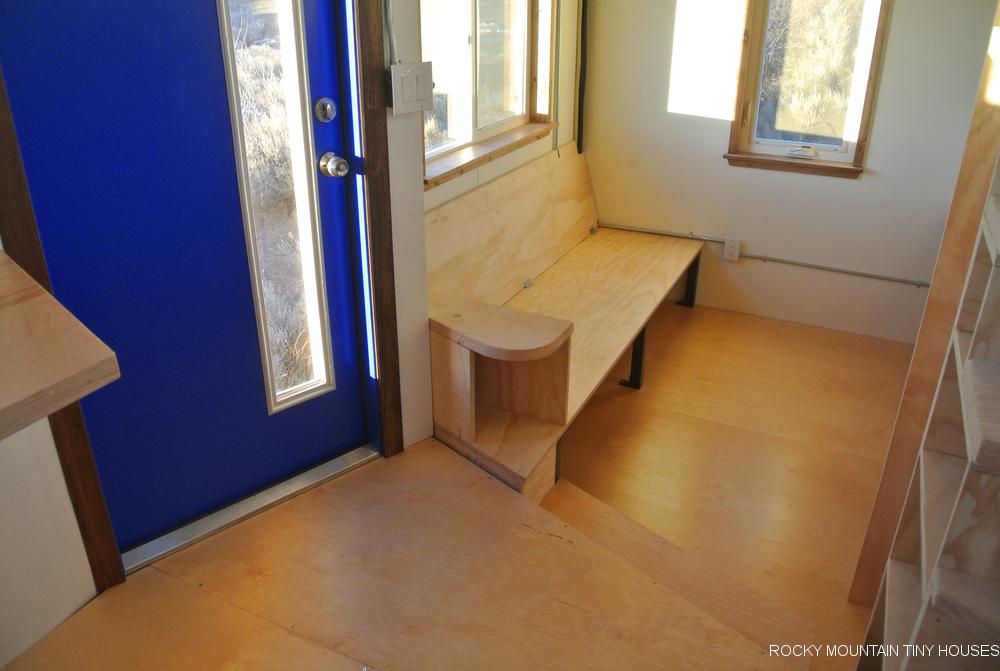
On the opposite end of the house is the living space which one has to take two steps down from the main platform to enter. At this point, I should note that this house was about a 98% build out. They had a set budget of $67,000 and asked us to complete as much work as we could within that budget, so you will notice in the photos that we left some simple tasks such as finishing the wood, trimming out a few corners, adding some door/drawers to the living room cabinet, and making cushions for the couch for the owners to complete. 

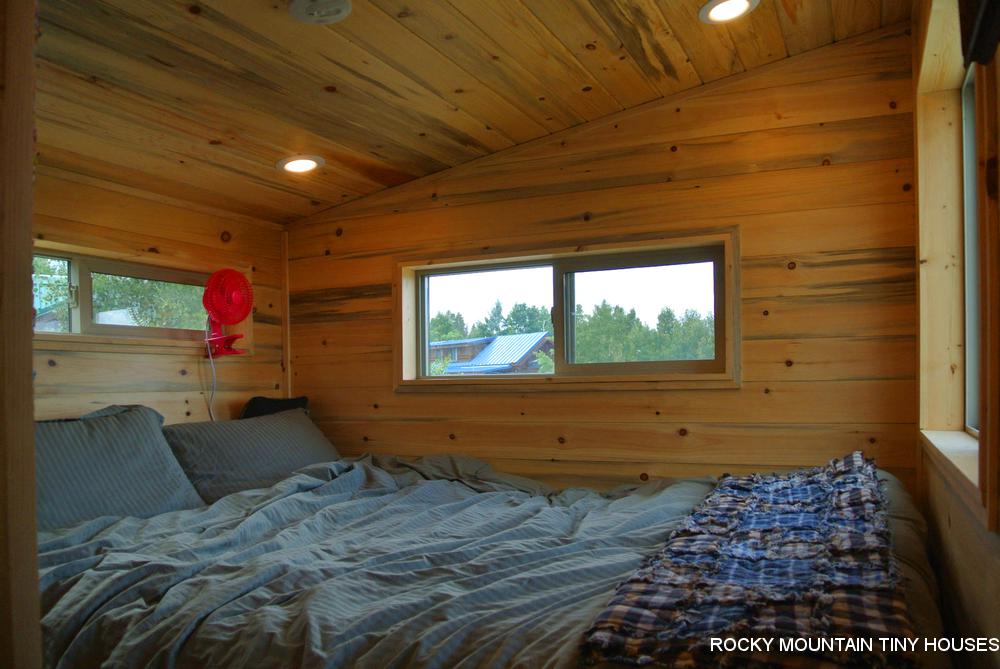
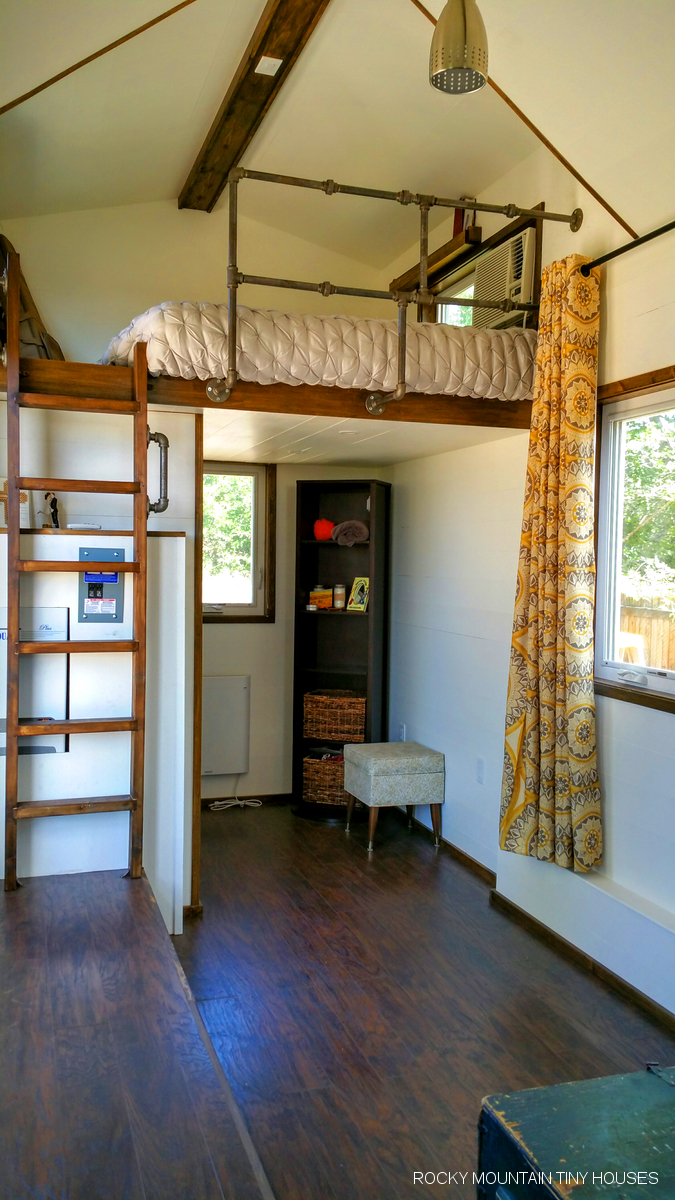
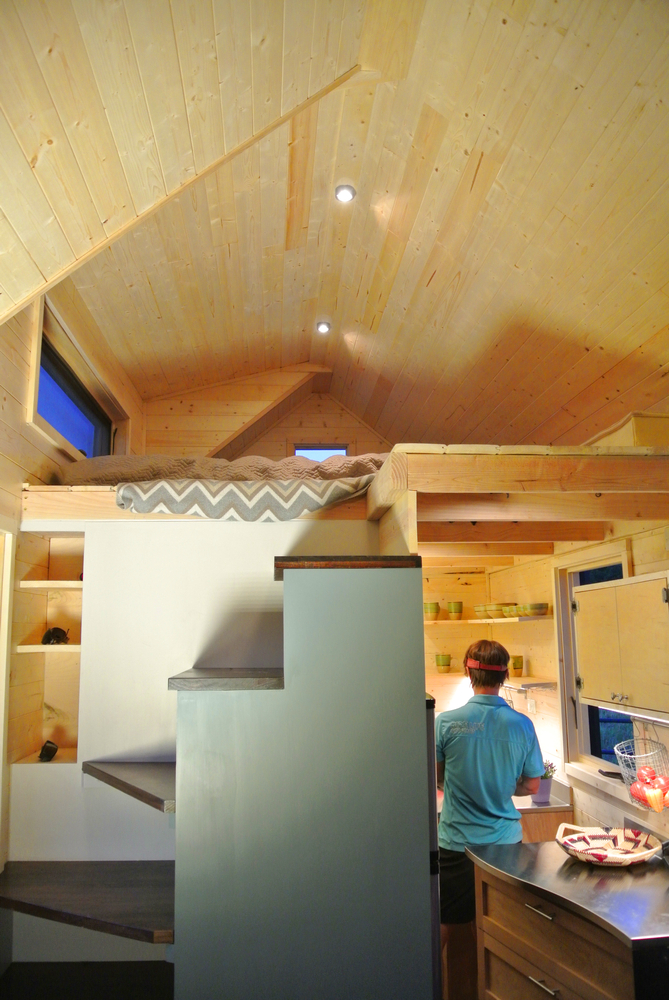
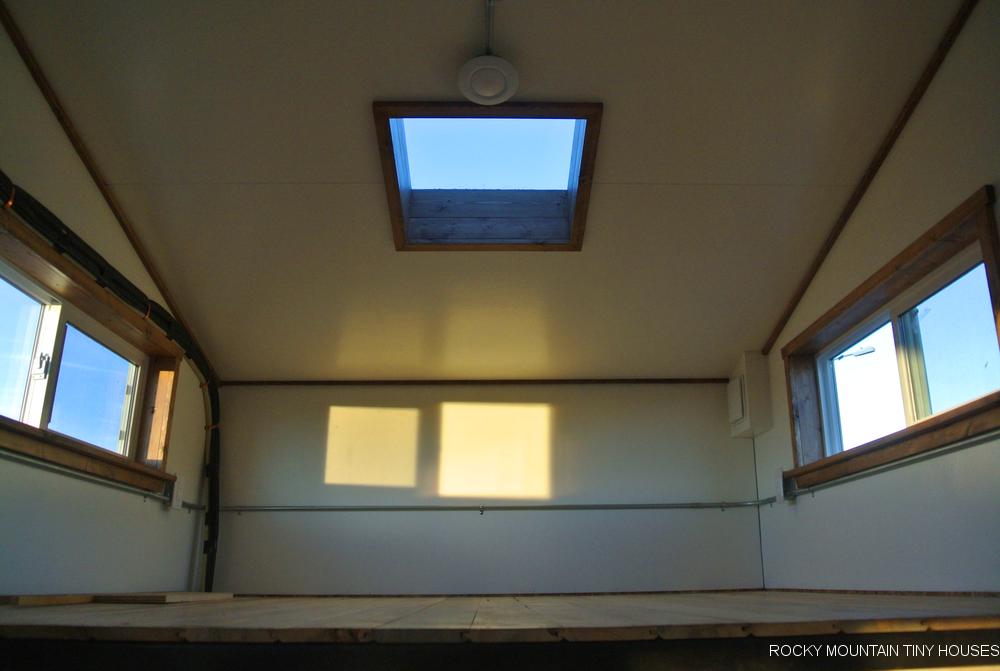
The stairs (doubling as storage cubbies and the closet) are on the same level as the platform, so there are two less risers needed to get into the loft. Up here, there is ample room for a queen mattress, plenty of headroom, and abundant light, in part to an overhead skylight! 

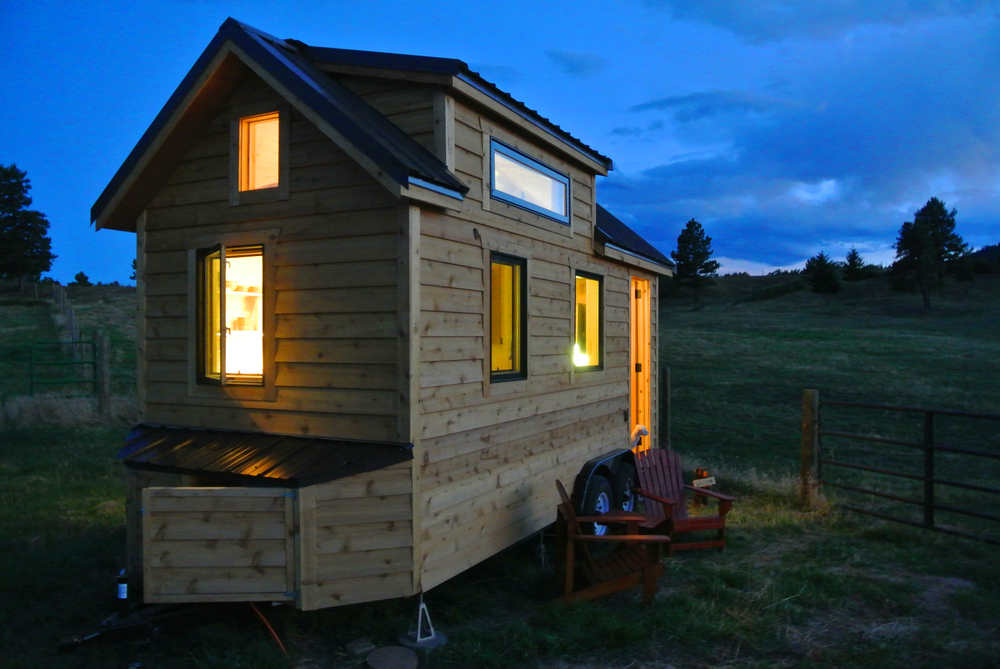
As mentioned, this project came in at $67k as shown with a few minor details not completely finished. As of late, we’ve had a few inquiries about whether we can a tiny house based on the Shedsistence design. The answer is yes! Since this design was quite different than that original version, we drew it up from scratch, and can totally do this for you too. If you like the Shedsistence design just the way it is and would like for us to build it, then we ask that you purchase the plans from them before coming to us. Out of respect for the original creator’s intellectual property, we ask that you do this for any build that is not a RMTH design and documented plans for sale exist for that particular design. Enjoy a few more photos and a video tour:


Filed Under: Tiny House Design Tagged With: 24' tiny house, drop axle tiny house, modern tiny house, montana tiny house, shed roof tiny house, Shedsistence, SIP tiny house, Tiny House Lab, vee nose tiny house

10’X24′ Leadville Shell

August 1, 2017 By Greg Parham 11 Comments

Some really great folks out of Leadville, CO hired us to construct this 10×24 shell. They wanted us to assist with the design. erect the shell out of structural insulated panels, install roofing, Tyvek, windows, and a front door before driving it up to Leadville.  The house needed to have stamped engineered drawings showing it could meet Leadville snow load, as well as good documention on attachment to the trailer and assembly of the SIP’s. We were happy and able to oblige! Since it was just a shell build, we didn’t really get too many great photos, but we are posting this project to not only let people know that we have the capability to do shell builds, even with SIP’s, build 10′ wide, deliver 10′ wide, and provide engineered drawings if your local jurisdiction requires. This will be the first legal tiny house in Leadville, and these customers had to work hand in hand with city officials to get it passed, but hopefully are establishing precedent for future residents in this town at 10,200′, as well as other cities across Colorado. This 10×24 SIP shell designed for 100 psf snow load as shown with roofing, windows, entry door, housewrap, and engineered drawings came in at 28k.   It would slightly less if you don’t need that high of a snow load or engineered drawings.


Filed Under: Company News, Tiny House Design Tagged With: 10' wide tiny house, engineered tiny house, Leadville Tiny House, legal tiny house, SIP tiny house, tiny house shell

The Rusted Mountain Roost

November 2, 2016 By Greg Parham 25 Comments

Rusty Mountain Roost gooseneck tiny house exterior

A semi-retired real estate professional from the Fairplay area hired us to build her dream tiny house roost! Like several other customers this summer, she was interested in a gooseneck chassis, but what really makes this house stand out from the crowd is the amazing corten steel (aka rusty cold rolled) siding. She provided us with very nice scaled drawings, and making only minimal changes we refined her design to make sure everything worked out. This house was framed using structural insulated panels (SIP’s), perfect for keeping the house nice and toasty at 10,000 feet during the cold South Park winters. The house is heated and cooled via a ductless mini split system.

Rusty Mountain Roost gooseneck tiny house hallway

Rusty Mountain Roost gooseneck tiny house bathroom

The other feature most visitors notice when first seeing the house is how large the bathroom is! While the bathroom doesn’t consume a lot of floor space, it is very tall and airy since we took the walls all the way to the shed roof ceiling and included a clerestory window up high. It has a nice sized neo-angle shower, a normal flush toilet, and a vanity with medicine cabinet above. There is a hidden compartment behind the bathroom and between the neck of the trailer that houses an upgraded Navien tankless water heater and storage space for items that don’t get used very often since the space can only be accessed via trap doors in the bedroom closet on the gooseneck.

Rusty Mountain Roost gooseneck tiny house kitchen

The kitchen is outfitted with custom cabinets and includes a generous pantry, a 24″ propane range, microwave/vent combo, 10 cu ft fridge, large single bowl sink set in the corner with a nice view out of corner windows, open upper shelves, and room for a combo W/D under the counter. The kitchen opens into the living space with features a large fold down dining table and comfy L-shaped couch with some display shelves above. Clerestory windows up high bring in abundant light. All walls and ceiling were finished out with Colorado beetle kill pine.

Rusty Mountain Roost gooseneck tiny house living

Rusty Mountain Roost gooseneck tiny house bedroom

Rusty Mountain Roost gooseneck tiny house closet

The master bedroom is housed on the gooseneck with ample room for someone 6′ tall to stand up in. It is accessed via a few steps that have pull out drawers. This space is completely blocked off from the rest of the house via the bathroom partition and a barnwood saloon doors that can be left shut for full privacy. The closet is very large with an array of rods and shelving to house personal belongings. There is a a trap door under the closet that leads to additional storage and access to the utility space.

Rusty Mountain Roost gooseneck tiny house guest loft

On the opposite side of the house is a guest sleeping loft with a built in closet that helps block this space off from the rest of the house for a little privacy as well. This loft is accessed via a special ladder that stores vertical when not in use and allows access to storage shelves behind it. The ladder pulls out when needed for action so that it is more comfortable and safe to climb.

This tiny house weighed in at 13,200 lbs and final cost came in at $84k with all of the custom features you see included. Enjoy the video tour below!


Filed Under: Tiny House Design Tagged With: beetle kill pine tiny house, colorado tiny house, Gooseneck Tiny House, rusty steel siding, rusty steel tiny house, SIP tiny house

SIPs vs Stick Framing For Tiny Houses

February 21, 2016 By Greg Parham 17 Comments

SIP tiny house

As one of the few builders capable of offering SIPs (structural insulated panels) as a construction method for tiny houses, I naturally get asked a lot of questions about the differences between SIPs and traditional stick frame. At long last, I found some time to sit down and write this post! I will say up front that either method, properly executed, will yield a well crafted, well insulated, sturdy tiny house that will serve its intended purpose for years to come. What ultimately drives our decision on which route to go will depend on timing of the project, anticipated climate where the house will be parked, and the shape of the tiny house. Major factors to consider are strength, weight, fabrication, insulative value,  design flexibility, electrical, plumbing, finish out, freight, and overall cost. For reference, we use EPS (expanded polystyrene) SIP’s and are comparing them to optimum value 2×4 framing with spray foam insulation.

Strength

SIP’s are hands down the strongest most rigid method of construction. So strong, in fact, that we typically use less steel in our trailers since after the walls are bolted to the trailer, the whole house becomes a composite part of the trailer structure. We can not only save a little weight in the trailer, but increase our head height a little since in shorter trailers we can use 4″ tall main frame members instead of 6″, or 6″ members instead of 8″ for longer trailers. Stick framing with a properly installed spray foam is also quite strong. Not far behind SIP’s if you ask me. If you are comparing to batt insulation or even hand stuffed rigid board, SIP’s are way stronger. As far as weight, it is a wide misconception that SIPs are lighter than stick frame. Compared to advanced framing methods that minimize framing lumber, we are finding SIPs to be about 5% heavier. Despite the absence of internal studs in SIPs, the fact that there is 7/16″ OSB on both sides contributes to the extra weight. I will say that some SIP manufacturers can use a MgO skin that can be finished like drywall, eliminating the need for a finish layer on the inside, which might make weight more even, but in the end, the 5% added weight on standard builds is not noticeable.

Insulation

The EPS foam used in SIP’s typically rates at about R5.5 per inch. Better than a lot of other products, but not as high as some of the spray foam products that can reach 7.1 per inch. The main difference is the lack of thermal bridging though. 2x lumber is normally rated at R1 per inch, so anywhere you have a framing member is a potential spot for heat transfer. In stick framing, you can negate this issue by adding a layer of 1/2″ or 3/4″ foam over you sheathing, but you are increasing your wall thickness and adding cost, time, and complexity to your build to the point where SIP’s would be a more cost effective option. The SIP industry likes to use a term called effective R-value, or overall R-value. This measures the R-value of the envelope as a whole, not just the per inch characteristics of the foam. By these measures, SIPs  clearly out-perform stick framing. I will point out that we are talking about tiny houses here, not large 2500 sq ft houses where energy efficiency is more important. Smaller spaces are easier to heat and cool by their very nature. I will say that SIPs make a lot of sense for people going to be parked in very cold climates, and by this I’m talking about Montana, Minnesota, Canada, Alaska, places in Colorado parked above 10,000 feet, and perhaps some place like the Adirondacks where nightime lows can reach -40F or lower. In milder climates, either system will perform great. In warmer climates such as the south, you will find SIP’s help keep the house a little cooler, but it’s my opinion the difference is small.

Fabrication/Erection

DSC_3065cSIPs are manufactured in a facility and shipped to site. All of the panels are cut to size and shape including all rough openings. Those with little experience cutting complicated roof shapes will find this attractive. Additionally, the panels are very straight, and as long as care is taken to layout sill plates square and parallel, you will have a structure that is very straight and easy to finish out. A good framer picks straight studs and rafters, but the reality is lumber is still a variable product and you inevitably end up with small variations that need to be accounted for in the finish out stage. With a good crew of 3 people, a typical SIP shell fully insulated can be erected in three days or less. By comparison, stick framing can take 5-10 days to get an insulated shell. I will note that use of a crane or forklift is not absolutely needed, but is very helpful in placing the roof panels when using SIPs. Otherwise you will need lots of manpower to hoist them up. We have access to a forklift and can lift large unbroken panels up easily. For those without this capability, you can request to have panels cut in smaller sections but this adds to the complexity when splicing the panels together. One good benefit of SIPs is that you will have a solid substrate to attach interior siding, cabinets, shelves, built-ins, tv mounts, you name it. You will not be searching for or be limited by studs spaced 24″ apart.

Flexibility

Its always best to have a very clear plan and remain with it whether you are using SIPs or stick framing, but there is some flexibility built into SIPs if you need to make changes down the road, such as enlarging, shrinking, or even relocating rough openings. There are some rules you cannot break when it comes to making cuts across splines, cutting openings more than 4′ wide, or cutting openings that are within 12″ of the top plate height. These are all things the manufacturer can educate you on should you need to make modifications. One other thing to consider is tiny house shape. SIPs are flat panels, they cannot be bent or rounded, although you can cut curves out of them. If you have a design that incorporates any kind of warp, twist, or spherical aspect, it will need to be stick framed. You can do hybrid versions such as we did on the Pequod design. The walls were pre-cut to the wavy shape and we stick framed the roof on top of them.

Pequod tiny house SIP

Electrical

Running wires in stick framing is a bit easier and allows for a little more flexibility when placing boxes and routing wire, but with the proper skills and tools one can still fish wires in SIPs without too much hassle. The trick is knowing how to utilize the grid of chases that are pre-cut into the panels. Chases are typically cut 12″ and 44″ horizontally above the floor and every 48″ vertically. Custom chases can be specified ahead of time if you know your electrical plan to a T. If you don’t, it’s ok. Using a hot ball and hot rod you can create your own runs to intersect with the chases. One of the trickiest parts to wire is transitioning from wall to ceiling. Proper prep work drilling holes in the right spots and making sure panels align correctly goes a long way in aiding this nuance, but you are allowed to hack the panels up a bit if need be and spray foam over the holes you cut out as long as wire is deep in the foam and not close to either surface.

Plumbing

Unlike electrical wires, plumbing pipes cannot be easily run through chases. We run all plumbing on the inside of the walls. This means you have to get creative in hiding pipes behind cabinetry and built ins, and sometimes building a baseboard chase to run them in. Or, if you don’t care, leaving them exposed. This does have the added benefit of having full access to your fittings should one ever fail. Of course, you can do this with stick framing as well, but given the choice most people will run pipes in the walls to avoid hiding them. It does help if you can clump all your plumbing fixtures close together, but we have successfully hidden pipes on 28′ builds where the kitchen is on one end and the bathroom is on the other.

Freight and Overall Cost

Because the SIPs we use come from another part of the country (Michigan to be exact), freight is a huge expense to factor in. Some other factories closer to Durango are starting to come online, but for the time being we are sticking with Porter SIPs because their product holds the most certifications and guarantees in the industry currently. This is where timing comes into play. A typical truckload can transport about 6 tiny house packages. If we can get at least three customers lined up for an order, then freight costs are manageable and make sense when compared to the cost of stick framing. Otherwise, one or two projects on one truck is going to be a bit pricey and we are going to be biased towards stick framing unless the customer is really just wanting to use SIPs. From a builder perspective, assuming we can keep freight down, the cost to erect a SIP tiny house is about the same as it is to stick frame and spray foam one. The product itself cost more upfront, but this is canceled out in labor savings. For a DIYer not placing a value on their time, SIPs are going to cost more.

Fresh Air

If you choose to build with SIPs or go the spray foam route, it is important to provide fresh air for you tiny house because it is going to be sealed very tight. This can be as simple as keeping windows open, or as complex as installing a heat recovery ventilator (HRV). You might even consider doing these things if you are building a tiny house that is not very tight and “breathes” well. Fresh air is critical for the health of the house and its inhabitants.


Filed Under: Tiny House Components, Tiny House Design Tagged With: SIP tiny house, SIPs, SIPs vs stick frame, structural insulated panels, tiny house construction

24′ Albuquerque Tiny House

October 5, 2015 By Greg Parham 58 Comments

Custom 24' Tiny House exterior

We are pleased to share the latest completed tiny house to leave our shop, a custom 24′ build that was delivered to a newly wed couple in Albuquerque, NM. The shell is constructed of Structural Insulated Panels (SIP’s) which are then finished out with gray stained cedar lap siding, natural stained cedar shakes, and galvanized corrugated roof on the outside and white tongue and groove on the inside with walnut stained accents/flooring.

This unique design centers around a set of French Doors that sit on the wheel well. You enter on a platform that is about 12″ above the main floor. Below this platform are pull out drawers for storage. On the left side of the platform is a ladder that climbs up to the sleeping loft that fits a queen size bed. The portion of the roof also has dormers on both sides for increased head height and airiness.

20150924_114154-3


On the right end of the lower platform is a higher platform that the kitchen is situated on. Beneath this platform is a full size bed that pulls out for guest sleeping. The small couch hides the end of the bed and rolls out of the way when needed. On the portion of the platform where there is dead space, we installed trap doors for even more hidden storage. A simple drop-leaf bartop with seating for two or three separates the kitchen space from the living area.

Custom 24' Tiny House living room


At the back of the trailer is a wet bath with some very nice tile work, a sliding barn door, and a customized exposed shower faucet that doubles as the sink spout. You cannot see from the photos, but there is a Nature’s Head composting toilet opposite the shower wall.

tiny house tile bathroom wet bath

Next to the wet bath is a nook that will serve as storage for time being, until a baby comes along and then it will be used for a baby crib!

custom 24' tiny house living room

All in all it is a simple layout with lots of volume and nice finishes, designed with an expanding family in mind. The design came almost exclusively from ideas the customer gave us, we just took these ideas and tweaked them a little bit to properly scale the components and make construction a little easier. For anyone interested in a similar build,  expect final costs to be in the $51k-57k range depending on desired features and finish out.

Albuquerque Tiny House


Filed Under: Company News, Tiny House Design Tagged With: 24' tiny house, custom tiny house, door over wheel wells, french door tiny house, platform storage, SIP tiny house, tiled wet bath

Custom SIP Tiny House (As Seen on TV)

January 4, 2015 By Greg Parham 29 Comments

SIP tiny houseA lovely couple from Colorado Springs commissioned me to build this tiny home for them in spring of 2014. As the time approached to get started on it late summer, a tv production company also contacted me asking if I had any unique builds going on or knew of any people building their own tiny house that they could film for a new tiny house reality series for HGTV. All I could send them was the contact for my clients to see if they were interested. Turns out, Derek and Mary were, and so we all agreed to let the house build be filmed.

After nailing down the details and getting all our ducks in a row, the crew came down to Durango from Denver on three weekends to film construction, and we filmed a fourth weekend in Colorado Springs once the house was complete and delivered. I wasn’t really able to talk much about the house, and absolutely none about the filming. We wanted to keep everything a surprise up until the air date.

The show aired back in December ’14, and so now it is ok for me to share this. People have been looking for more info about this house and haven’t been able to find it, until now!

Like all tiny houses that pass through the shop, this was a full custom design and build from scratch. Here are some of the design parameters we had to work around:

  1. Needed to be light enough to be towed by a 1/2 ton Ford F-150
  2. Needed to be warm, since the clients might have to move to a colder climate for work
  3. Needed stairs that their dog Buddy could go up and down
  4. Also needed a doggy door for Buddy.
  5. More or less a traditional looking tiny house, but with some contemporary flair
  6. Stainless counterops. A fridge larger than typical dorm style fridges.
  7. Woodstove, and Dickinson propane heater if feasible
  8. Room for a store bought couch. Also enough wall space to mount a 40″ tv

I worked with the Voight’s extensively to refine the design. I had just developed a great relationship with a SIP (structural insulated panel) company while on business trips to Boulder earlier in the winter. In fact, I had just built 3 energy huts for Hunter Douglass using SIP’s the month before, so I had learned about how the product goes together and was excited to apply it to a full time living tiny house. Luckily, Derek and Mary were open to SIP’s and were ready to become one of the few owners of a tiny house made from SIP’s.

tiny house SIP construction

SIP’s are a cool building product to work with, esp. for tiny houses. You absolutely have to pay attention to the minuscule details, however, or you are going to fight the system until it drives you crazy. My experience with the other three SIP structures along with the help of a very good sales rep made the assembly of these panels a breeze. I made absolutely sure my trailer was square and level before starting. We triple checked the locations of our baseplates before raising the walls. We made sure all of our edge nailers were flush with the OSB and no dried glue was sticking out. We left some wiggle room in key places. Everything went together perfectly until the last dormer roof panel. Things had somehow gotten a hair off, and a hair multiplied over nine or ten feet can add up to 1/4″ on the other end. Luckily, we were able to attach some mounting plates to key areas of the roof and pull everything into plane using winches.

I called Derek the other day to see how the SIP’s were performing now that they are in the dead of a Nebraska winter. He said “Great, it’s -4 outside and 77 on the inside.” Without doubt, the thermal performance of SIP’s is the number one reason to use them, but let me also cite a few more:

  • They go up very fast compared to stick framing. The added cost of the product outweighs the labor time involved with traditional methods
  • They are CNC cut, from the angles of the walls and roof panels, to the rough openings for the windows and doors. You are left with a very precise shell that makes it easier to install windows, siding, and interior wood.
  • You have a solid substrate to attach components to on the inside. No need to locate a stud, just screw or nail anywhere and you will hit meat.
  • they are strong as all get out. So strong, that you can actually use less steel on your trailer frame and still have a tiny house that is stronger than a stick frame house with an overbuilt trailer. The use of SIP’s on a trailer really takes rigidity to a whole new level. This was important since we were trying to keep weight down

SIP’s do have their drawbacks, too, but I will save this for a later post since they did not effect any of the design goals for this project. Moving along, here are some quick stats of the finished product:

  • custom fabricated 18′ trailer with (2) 5200# axles equipped with brakes and a break away system
  • Walls and Ceiling constructed from pre-engineered 4 5/8″ Structurally Insulated Panels. Floor insulation and subfloor is integrated into trailer frame to provide an extra 4″ of headroom
  • Finished dry weight came out to 6900# This was within the weight rating of Derek’s truck with a little bit to spare for personal goods
  • Electric and Water supply are setup for grid tie
  • Grey water goes to a gravel collection pit that the clients installed after delivery. Solid wastes are handled via a “humanure” composting toilet
  • Primary heat is provided by a woodstove, backup heat by a propane Dickinson Marine Newport
  • A/C not required due to temperate climate
  • Cost for a replicate would be in the 46k range

Due to all the filming craziness, I wasn’t able to snap too many shots of the finished product, but I did get a few:

SIP tiny house exteriortiny house stairs

tiny house couch

tiny house curved counter

tiny house dormer loft

tiny house modern kitchen


To close this post out, I would like to share a photo that the clients sent me with the house all settled in alongside a sweet deck that they installed on top of an old trailer frame that was laying around at the Nebraska farm where they are parked. Tiny House, Big Living!

tiny house with big deck


Filed Under: Company News, Tiny House Design Tagged With: SIP, SIP tiny house, structural insulated panel, tiny house big living, tiny house TV show

  • Facebook
  • LinkedIn
  • Pinterest
  • YouTube
Rocky Mountain Tiny Houses 18' Boulder
FRONT RANGE TINY HOUSE
Pequod tiny house exterior
Pequod tiny house countertop
Pequod tiny house catwalk
custom hOMe build exterior1
custom hOMe tiny kitchen
log cabin tiny house kitchen
Custom Tiny House Plans
Colorado Tiny House
Colorado Tiny House
tiny house custom wood countertop
tiny house towing
tiny house towing
steampunk light fixture
Mandy Harris
Austin Tiny House Kitchen
Mandy Harris
Tiny House barn door
Mandy Harris
Funk East Austin Tiny House
Mandy Harris
Austin Tiny House interior
East Austin Funky Tiny House Exterior
Mandy Harris
Boulder Interior
Boulder Interior
Boulder Tiny House front
Boulder custom light
Boulder tiny house porch lights
Rocky Mountain Tiny Houses Boulder side
Durango tiny house in winter
Durango Office
Durango Office
Durango Bookshelf
Durango Bookshelf
Durango Detail
Durango Detail
Shower Detail
Shower Detail

Tiny House Updates

  • 28′ Bandelier
  • 20′ Hermosa Tiny House
  • The Beatle 22′ Tiny House
  • 10×32 Hill Tiny House
  • Emerald Lake 10×32
  • Spring ’24 Update
  • 2024 Update!

Tiny House Magazine

RMTH was recently featured as "Builder of the Month" in issue 32. You can purchase this issue, or any other issue, by clicking here

Oh Yeah

​Tiny House Blogs

Advertisements